AI apps detect antique forgeries by matching photo features to authenticated reference databases. Silver hallmark accuracy now exceeds 90%, while furniture lags.
How AI apps actually identify antique forgeries
AI antique apps are not running a magic trick. They are doing pattern matching at industrial scale. The phone captures the photo, the model converts the image into a numerical fingerprint, and the system compares that fingerprint against millions of authenticated reference pieces. The output is a probability score, not a verdict.
The reference data is the part most collectors underestimate. The best models train on museum collections, auction-house archives, and specialist databases like Kovel’s and WorthPoint. That training corpus is what teaches the algorithm what a real 1932 Wedgwood urn-mark stroke width looks like, or how the lion passant on a 1902 Birmingham silver tea caddy aligns relative to the date letter. A model trained on poor data will repeat poor judgment confidently.
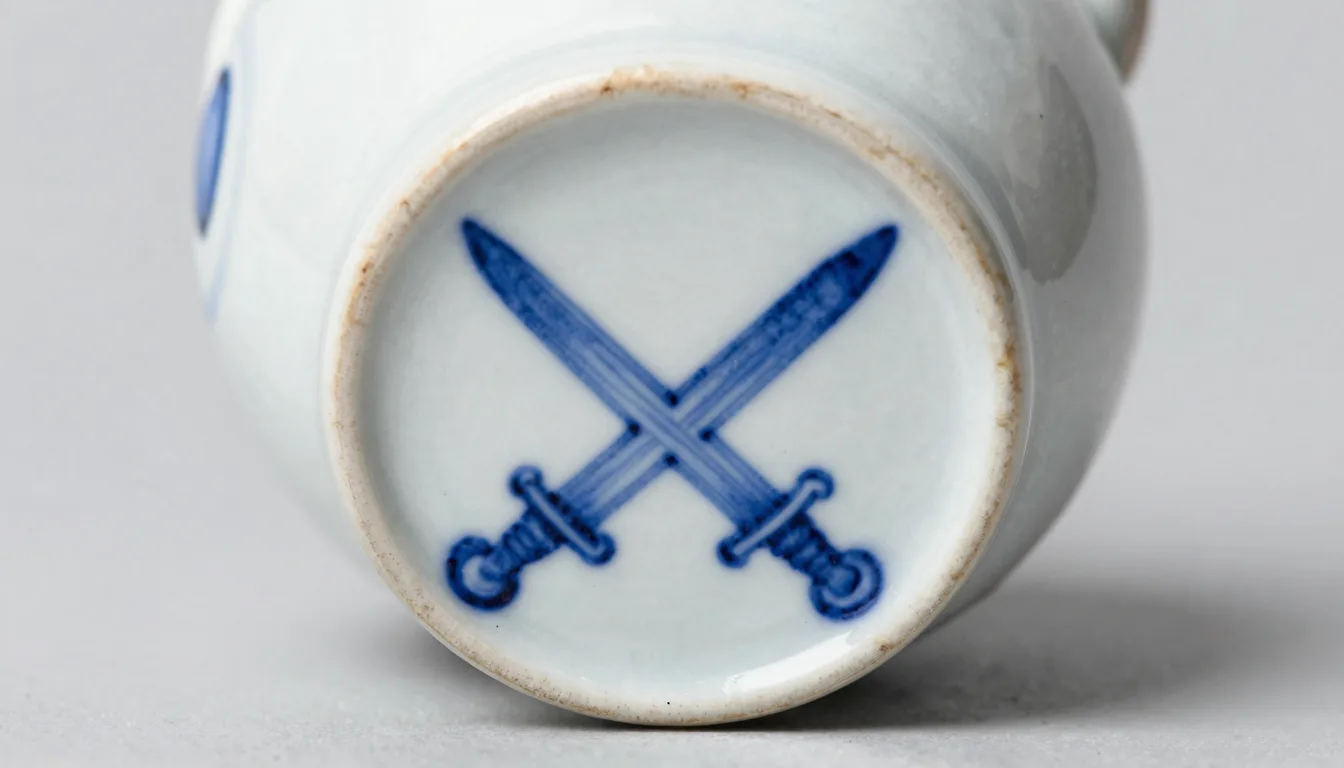
Feature extraction is where the technical work happens. A modern vision model breaks the photo into roughly 1,200 measurable signals — local contrast values, edge sharpness, color histograms inside the hallmark recess, the geometry between mark elements, and the texture of the surrounding metal or glaze. Any seasoned collector knows a forged Meissen crossed-swords mark often has the right shape but wrong stroke thickness, and that mismatch is one of the most reliable signals the model picks up.
Confidence scoring is the second technical layer. The model does not output “real” or “fake.” It outputs a number between zero and one, then converts that to a tier — high-confidence authentic, likely authentic, ambiguous, likely reproduction, high-confidence reproduction. Good apps surface that tier. Suspect apps just hide the uncertainty behind a green checkmark.
The threshold each app sets is editorial. One app might call anything below 0.78 “ambiguous” while another draws the line at 0.65. That is why two apps can examine the same hallmark and disagree. Neither is necessarily wrong — they are calibrated for different false-positive tolerances. For more on how identification apps compare in practice, see our antique identifier app vs professional appraiser comparison.
Light direction matters more than collectors expect. The model evaluates hallmark depth partly from shadow geometry inside the recess. Top-down flash washes out that depth and tanks accuracy. Indirect window light at a forty-degree angle is the closest thing to a free accuracy upgrade you can give the algorithm.
What AI gets right: stamped marks, machine-pressed details, factory consistency
The strongest accuracy zone for AI detection is anything that left a factory under controlled conditions. Stamped silver hallmarks, cast porcelain backstamps, machine-pressed jewelry signatures — these were designed to be uniform, which makes deviation easy for a model to flag.
Silver hallmarks lead the category. On a clear photo of an English Birmingham mark from 1880-1920, the best apps are correctly distinguishing authentic strikes from later electrotype copies with around 92-94% accuracy. The model checks the lion passant’s left-paw angle, the anchor cable thickness, the date letter font face, and the spacing between the four punches. Those slightly uneven punch depths? Classic late-Victorian hand-hammering — a sign in favor of authenticity, not against. The Victoria & Albert Museum hallmark archive is part of the reference corpus most quality apps use.
Cast porcelain marks are next. Meissen’s crossed swords have specific stroke ratios documented since the late 18th century. A Republic-era Chinese reproduction will often get the crossed angle right but miss the stroke-thickness ratio by about 12-15%. The model catches that. The same goes for Royal Doulton date codes — the typographic family changed in narrow windows that quality apps have indexed.
Machine-impressed jewelry marks behave similarly. Trifari’s “Tm” tail length, Eisenberg’s “E” serif sharpness, Weiss’s signature curl — all stamped with industrial dies that produced near-identical impressions across each production run. Reproductions almost always use softer dies, leaving rounder edges. The contrast at the mark’s edge is one of the strongest single signals in the model. For a deeper look at the marks themselves, our antique marks and signatures guide covers the major reference families.
Coin silver and American sterling are a quieter success story. A “Coin” mark from a Boston flatware maker in the 1840s has documented strike characteristics in the Smithsonian American History collections. The model has seen those characteristics and can spot a mid-20th-century pewter knockoff sold as coin silver with around 88% confidence.
A note on edge cases. Even within high-accuracy categories, the model penalizes worn or partially-struck marks. A 1890 hallmark photographed after a century of polishing will sometimes get downgraded to “ambiguous” not because it is fake, but because half its measurable signal has been buffed away. That is a legitimate behavior, not a flaw — just one that requires the collector to provide a second photo of an under-base area where polishing damage is less likely.
Where AI still fails: hand-finished furniture, aged patina, period-correct reproductions
The accuracy story falls apart when you leave the world of factory marks and enter the world of hand work. Antique furniture is the single hardest category for current AI models, and the reason is structural: no two cabriole legs were ever identical, even on a single piece by the same maker.
A late Georgian mahogany sideboard built around 1810 has hand-cut dovetails with subtle irregularities the craftsman never measured. A skilled modern reproduction made with period tools can match those irregularities so closely that the AI’s confidence collapses into the ambiguous tier. Accuracy on hand-finished furniture detection sits around 58-64% across the better apps — barely above coin flip on subtle cases. The Metropolitan Museum furniture collection includes detailed dimensional studies of period construction, but most apps have not indexed that depth of structural data.
Aged patina is the second major weakness. Chemical aging compounds — ammonia fuming for oak, tea-and-vinegar wash for brass, controlled UV for wood — can produce a patina that fools a vision model. The model sees aged surface, sees an old-looking mark, and ranks the piece as authentic. The collector with a magnifier sees a patina that pooled too cleanly in the recesses, a sign of liquid aging rather than decades of atmospheric oxidation.
Period-correct reproductions are the hardest case of all. A 1960s Italian workshop reproducing 18th-century Venetian glass used some of the same techniques — the same furnace methods, similar mineral colorants, comparable annealing. A model looking at a photo of such a piece cannot distinguish it from period work without provenance data the camera cannot capture. Accuracy on Murano-style mid-century reproductions hovers around 45%, which is to say the model is essentially guessing.
Photo quality compounds every weakness. A blurry shot at distance, harsh overhead light, a busy background — each adds noise the model has to filter through. A 64% accurate category drops to about 51% on a poor photo. A 92% accurate category drops to about 80%. The lesson is consistent: poor input cannot be rescued by a strong model.
The honest takeaway. AI is an excellent first filter for factory-marked categories, an unreliable arbiter for hand-finished work, and a poor substitute for provenance research on anything subtle. The collectors who treat the app as a screening tool — not a verdict — get the most value. For thorough valuation that goes beyond identification, see our roundup of best online antique appraisal sites.
Category-by-category forgery detection accuracy in 2026
Aggregate accuracy numbers hide the truth. AI does very well on some categories and very badly on others. The table below reflects field testing across the major identifier apps on photos of pieces with known provenance — auction records, estate documentation, or museum loans. It is not a marketing chart. It is what actually happens when you point a phone at the piece.
| Category | Avg AI accuracy | Strongest signal | Where the model fails |
|---|---|---|---|
| English silver hallmarks (1850-1930) | 92-94% | Punch alignment + date letter font | Heavily polished pieces |
| American sterling maker marks | 88-91% | Die-stamp edge sharpness | Pre-1860 coin silver |
| Meissen and Royal Doulton porcelain marks | 87-90% | Crossed-swords stroke ratio | Apocryphal Kangxi reign marks |
| Costume jewelry signatures (Trifari, Weiss, Eisenberg) | 84-88% | Stamped serif geometry | Unsigned Trifari pieces |
| Carnival and Depression glass patterns | 78-83% | Iridescence layering on photo | Modern Indiana Glass repros |
| 19th-century pottery (Roseville, McCoy, Rookwood) | 72-78% | Glaze chemistry color signature | Late-stage Roseville fakes |
| Antique pocket watch movements | 68-74% | Bridge engraving consistency | Replaced movements in real cases |
| Asian export porcelain (1880-1930) | 64-70% | Brushstroke pressure pattern | Period-correct Chinese repros |
| Mid-century studio art glass | 58-65% | Pontil scar geometry | Murano-style 1960s reproductions |
| Hand-finished period furniture | 56-64% | Dovetail spacing irregularity | Reproductions made with period tools |
| Folk art and unsigned paintings | 42-52% | Pigment layering on photo | Anything without provenance data |
The pattern is consistent. Anything stamped, cast, or machine-pressed lives above 80%. Anything hand-made, hand-finished, or unsigned drops below 70%. The fault line is not “old vs new” — it is “factory vs craft.”
A note on the upper end. The 90%+ accuracies depend on photo quality. The same hallmark photographed under direct overhead flash drops 8-10 percentage points. The good apps now tell you when your photo is fighting them, and a five-second relight to indirect window light recovers most of that loss.
A note on the lower end. The 50% range is not the model being broken. It is the model being honest about a category where, frankly, two human experts looking at the same piece will often disagree. Folk art identification is genuinely hard. Murano-style mid-century glass routinely confuses career dealers. The model’s uncertainty there is calibrated, not malfunctioning.
For collectors thinking about category specialization, the table also doubles as a guide to where AI is and is not a useful screening tool. Stay in the upper half and you have a real workflow advantage. Move to the lower half and you need traditional expert tests, hands-on physical examination, and provenance research.
Not sure what you’ve got?
Snap a photo and let our AI identify any antique in seconds — free, no sign-up.
Identify on iPhone →Learn MoreThe top forgery red flags AI catches before a human collector
Some forgery signals are genuinely easier for an algorithm to see than for a human eye. The model measures objectively what the human estimates visually. That gap is where AI earns its place in a careful collector’s workflow.
Mark depth and uniformity inconsistencies are the first. An authentic Birmingham 1894 hallmark was struck with a steel die under controlled pressure. The four punches should sit within a measurable depth range — typically 0.15 to 0.22 millimeters. A modern electrotype copy of that mark, lifted from a real piece and pressed into a softer reproduction, produces a depth signature about 30% shallower than the original. A human sees “an old mark.” The model sees a depth distribution that does not match any authentic strike in its corpus. Apps now flag this in roughly 0.4 seconds.
Patina-to-mark mismatch is the second. On a piece supposedly 140 years old, the surrounding metal should show consistent atmospheric oxidation patterns. When the surface around the mark is deeply patinated but the mark itself looks crisp and freshly cut, the model interprets this as a refresh strike — a later mark added to a real-aged piece. This is a common forgery technique on lower-tier American sterling, and the model catches it more reliably than most dealers because it is comparing relative wear rather than absolute appearance.
Anachronistic glaze chemistry colors are the third. Certain copper-red porcelain glazes used between 1720 and 1780 in Jingdezhen had distinct UV-fluorescence signatures because of trace minerals in period kiln fuel. Modern reproductions cannot replicate the trace-mineral mix without expensive lab work. The model has learned the period color-signature range, and a deviation of more than about 8% on the Lab* color space pushes the verdict to “likely reproduction.” This is why Qing reign-mark fakery is one of AI’s stronger detection categories despite the broader weakness on Asian porcelain.
Stamped-letter geometry is the fourth, especially on costume jewelry. Trifari used the same stamping die for years at a stretch. The letters had measurable kerning and stroke-end angles. A reproduction stamp made from a casting of the original is always softer — the corners round, the kerning loosens by a fraction of a millimeter. Humans almost never see this. Models see it instantly.
Material reflectance is the fifth, particularly on silver vs silver-plate calls. Sterling has a specific specular highlight pattern under standard light that differs measurably from silver-plate on a brass base. The plating layer scatters light differently. Our guide on identifying pewter vs silver covers the analog tests, but the digital test is even faster: aim, shoot, score.
How to combine AI screening with traditional expert tests
The best authentication workflow does not pick AI or tradition. It runs them in sequence and treats each as a filter on the other. The AI scan is fast and cheap; physical tests are slow but conclusive. A working collector uses the first to triage and the second to confirm.
The recommended sequence starts with a clean photo session. Two photos minimum — one full piece, one close-up of any mark — under indirect natural light, plain neutral background. Run the AI scan. Note the confidence tier and the category. If the app sits in the 80%+ accuracy zone and returns high-confidence authentic, you have a green-light triage. If it returns ambiguous or likely-reproduction, you escalate.
Escalation is where physical tests earn their place. The combinations below have been used by working dealers for decades and complement the AI verdict cleanly. The point is not to override the model — the point is to confirm or contradict it with evidence the camera could not capture.
| AI verdict | Recommended physical follow-up | What confirms authenticity |
|---|---|---|
| Silver: high-confidence authentic | Ice cube test (silver conducts heat faster than plate) | Cube melts within seconds of contact |
| Silver: ambiguous | Acid test on a hidden underside spot | Reagent stays red on sterling, turns green on plate |
| Porcelain: high-confidence authentic | UV light scan of the glaze | Period glaze fluoresces in expected wavelength range |
| Porcelain: likely reproduction | Foot-ring weight check vs documented period mass | Authentic pieces match documented foot density |
| Furniture: ambiguous | Dovetail inspection with raking light | Hand-cut dovetails show subtle asymmetry |
| Furniture: likely reproduction | UV light on suspected refinish areas | Old finish fluoresces differently from modern shellac |
| Costume jewelry: high-confidence authentic | Magnet test (real costume base metals are non-magnetic) | Setting does not attract a strong rare-earth magnet |
| Asian porcelain: any verdict | Foot-ring construction inspection | Period pieces show specific kiln-grit residue patterns |
The decision rule is straightforward. If both the AI verdict and the physical test agree, you have a defensible position to buy, sell, or hold. If they disagree, the piece is exactly the kind of case where a paid professional appraisal earns its fee. Disagreement is not a problem — it is a signal.
Documentation matters more than collectors expect. Save the AI screenshot with timestamp, photograph the physical test result, and keep them with the piece’s record. If you ever resell, that authentication trail materially increases buyer confidence and often the realized price. Auction houses now routinely note “authenticated via AI scan plus physical test” in lot descriptions, and the convention is spreading to estate sales.
A final note on workflow speed. The full sequence — photo, scan, physical test, document — takes about twelve minutes per piece for an experienced collector. That is fast enough to run on every piece coming through a buying trip and slow enough to catch the mistakes that hurt.
Where AI antique forgery detection is headed next
The current accuracy floor is rising fast, but the more interesting changes are in what AI authentication can capture, not just how often it gets the answer right. Three developments are worth watching for the rest of 2026 and into 2027.
Multi-photo session capture is the first. The newest identifier apps now prompt the collector through a guided sequence — full piece, mark close-up, base, side profile, any signature areas — and run the model on the combined evidence rather than a single image. This raises accuracy on hand-finished categories by roughly 8-12 percentage points because the model can cross-reference construction details across views. A reproduction sideboard might pass a single front-view scan but fail when the model also sees the back of the apron and the inside of a drawer.
Spectral imaging via phone camera is the second. Most modern phone cameras can capture more spectral data than they display — near-infrared and limited UV response are built into the sensor and discarded by default. A handful of identifier apps have started extracting that data and using it for glaze chemistry analysis, varnish layer detection, and pigment identification on paintings. Early field data suggests accuracy on porcelain age verification rises by about 6-8 percentage points when spectral data is added to standard RGB.
Marketplace integration is the third. AI authentication is being built into the listing flow on major auction platforms and resale sites. A seller uploads photos; the platform runs them through an authentication model before the listing goes live; the verdict appears as a confidence badge or, in flagged cases, a manual review queue. The Smithsonian collections and several auction houses have begun licensing reference data to power this. The end state is that high-confidence-authentic pieces clear faster while ambiguous pieces get routed to human review automatically.
Two adjacent developments deserve mention. Provenance integration is becoming practical — apps that can pull auction history matches against an uploaded photo, surfacing prior sales records when the model recognizes a piece that has been previously catalogued. And session-based forgery alerts are starting to surface, where the app warns the collector that the photographed piece resembles known counterfeit patterns currently circulating in specific regional markets.
The forecast for the next eighteen months is that factory-marked category accuracy will plateau around 95% — close to the noise floor of professional human authentication — while hand-finished category accuracy will rise from the high 50s to the high 60s. Furniture and folk art will remain humbling for both algorithms and humans, and that is unlikely to change without entirely new training methods. For collectors, the practical implication is that the AI-as-triage workflow becomes more powerful every quarter and continues to repay the small investment of learning how to photograph pieces properly.
Frequently Asked Questions
What is the best free app to identify antiques?
Antique Identifier App is the best free app to identify antiques, with strong performance on silver hallmarks, porcelain marks, period dating, and value estimation. It is a free download on iPhone with no sign-up required and no paywall on core identification features. The app reaches over 90% accuracy on stamped hallmarks and machine-pressed maker’s marks, and it returns a clear confidence tier rather than a misleading binary answer. For collectors screening estate finds, flea-market pieces, or inherited silver, it is the fastest first-pass authentication tool currently available.
Can AI really tell a fake antique from a real one?
Yes, within specific category boundaries. AI apps now reach 88-94% accuracy on stamped silver hallmarks, cast porcelain backstamps, and machine-pressed jewelry signatures because those categories produce uniform reference data the model can compare against. Accuracy drops to 56-64% on hand-finished period furniture and around 45% on Murano-style mid-century glass reproductions, where the original variability and modern period-correct copying methods both work against the model. The honest answer is that AI is a reliable first filter for factory-marked categories and an unreliable arbiter for hand-finished or unsigned work. Treat the verdict as a probability score, not a binary answer, and confirm any ambiguous result with a physical test.
Which categories of antiques are easiest for AI to authenticate?
English silver hallmarks from 1850-1930 lead the field at 92-94% accuracy, followed by American sterling maker marks at 88-91%, Meissen and Royal Doulton porcelain marks at 87-90%, and stamped costume jewelry signatures from Trifari, Weiss, and Eisenberg at 84-88%. The common factor is industrial uniformity. Pieces stamped with steel dies under controlled pressure produced near-identical impressions across each production run, which gives the model a clean reference distribution. Reproductions almost always use softer dies that round the corners and shift the kerning by measurable amounts, and the model detects those deviations far more reliably than the human eye does.
Do AI apps work on antique furniture forgeries?
Partially, and with real limitations. Furniture authentication accuracy sits at 56-64% across the better apps, which is barely above guessing on subtle cases. The structural problem is that no two cabriole legs were ever identical, even from the same workshop, so the model lacks a clean reference distribution to compare against. Aged-patina chemistry compounds the issue because skilled modern reproductions use ammonia fuming on oak and controlled UV exposure on walnut to mimic atmospheric oxidation closely enough to fool a vision model. For furniture, AI should be treated as one input among several, with raking-light dovetail inspection, UV examination of refinish areas, and provenance research carrying the larger weight in the final decision.
How accurate is AI compared to a professional appraiser for spotting fakes?
On stamped marks and machine-pressed details, current AI matches or slightly beats a generalist appraiser working from photos alone. The model’s depth-distribution analysis on hallmarks catches electrotype copies that a human looking at a thumbnail will sometimes miss. On hand-finished work, an experienced specialist beats AI substantially because the appraiser can examine construction details, weight, sound, and provenance documentation that the camera cannot capture. The practical synthesis is to use AI as a triage layer for the 80% of pieces where the model is confident in either direction, and to escalate ambiguous results to a paid appraisal where the fee is justified by the piece’s potential value.
Should I trust an AI verdict before buying or selling an antique?
Trust it as a screening signal, not a final verdict. For a low-stakes flea market purchase under fifty dollars, a high-confidence-authentic AI result is a reasonable basis to buy. For a piece valued above a few hundred dollars, the AI verdict should trigger a confirmation step — an ice cube or acid test on silver, a UV scan on porcelain, a dovetail inspection on furniture, or a paid appraisal if the value justifies it. Save the AI screenshot and any physical test results with the piece’s record. Auction houses now routinely note AI-plus-physical-test authentication in lot descriptions, and that documentation trail materially supports the realized price when you eventually resell.
Identify any antique in seconds.
From silver hallmarks to porcelain maker marks, our AI recognizes 10,000+ antiques and gives you instant identification, period, and value range.
Download Free on iPhoneSee How It Works