Tag: antique identifier

  • Antique Restoration vs Conservation: Value

    Antique Restoration vs Conservation: Value

    Antique Identifier app - free download, no signup required

    The Critical Decision: Restore, Conserve, or Preserve?

    Every antique owner faces a crucial decision that can dramatically affect both monetary and historical value: should you restore, conserve, or leave an item in its original condition? Making the wrong choice can destroy 50-90% of an antique’s value instantly. Understanding the differences between restoration and conservation, and knowing when each is appropriate, protects your investment while preserving history. This comprehensive guide reveals professional approaches to antique valuation through proper care, helping you make informed decisions that maintain or enhance worth.

    Understanding the Key Differences

    Restoration: Making Old Look New

    Restoration aims to return items to original appearance:

    • Goals:
      • Recreate original appearance
      • Replace missing parts
      • Refinish surfaces
      • Restore functionality
      • Remove all damage signs
    • When Appropriate:
      • Family heirlooms for use
      • Severely damaged pieces
      • Common items without rarity
      • Modern collectibles
      • Personal preference items
    • Impact on Value:
      • Can decrease value 30-70%
      • Removes original patina
      • Destroys age indicators
      • May improve usability
      • Appeals to decorators

    Conservation: Stabilizing and Preserving

    Conservation maintains authenticity while preventing deterioration:

    • Goals:
      • Stabilize current condition
      • Prevent further damage
      • Maintain original materials
      • Document all work
      • Ensure reversibility
    • When Appropriate:
      • Museum-quality pieces
      • Rare or valuable items
      • Historical artifacts
      • Investment pieces
      • Significant provenance
    • Impact on Value:
      • Maintains or increases value
      • Preserves authenticity
      • Professional work adds credibility
      • Documentation important
      • Preferred by collectors

    Preservation: Maintaining As-Is

    Sometimes doing nothing is the best choice:

    • Goals:
      • Maintain current state
      • Proper storage only
      • Minimal intervention
      • Document condition
      • Monitor changes
    • When Appropriate:
      • Excellent original condition
      • Desirable patina present
      • Stable materials
      • No active deterioration
      • Market prefers untouched

    What Does Furniture Conservation vs Restoration Look Like in Practice?

    The clearest way to see the difference is to follow one piece through both workshops. Take a circa 1820 painted pine blanket chest with a cracked lid, a missing bracket foot, flaking original blue paint and a later coat of brown house paint on the front.

    ProblemConservator’s treatmentRestorer’s treatment
    Cracked lidReversible hide glue, fill kept below the surface, documentedCrack filled, sanded flush, whole lid refinished
    Missing bracket footNew foot in old pine, toned to blend but recorded as a replacementNew foot cut, whole base refinished to match
    Flaking original blue paintConsolidated with a reversible adhesive so no more paint is lostLoose paint scraped off, surface repainted blue
    Later brown overpaintSolvent tests on a hidden spot, brown removed layer by layer, original blue left untouchedEverything stripped to bare wood or painted over
    RecordsBefore and after photos, materials list, treatment reportUsually none

    The overpaint row answers a question many owners ask: can you remove new paint and save the old paint underneath? Yes, but only when the two layers respond differently to a solvent, and only after testing, which is why this job belongs with a trained conservator rather than a stripper and a scraper. Original paint is identified by fine age cracking that runs through the layer, by wear on edges and around handles where hands touched the piece, and by paint sitting inside old shrinkage cracks. Later paint sits on top of those cracks and shows no matching wear. The same reading of surfaces is what separates a period piece from a reproduction, as explained in our guide to telling new wood from old patina. Hardware tells a parallel story: original nails, screws and hinges are evidence a conservator keeps and a restorer often replaces, so learn how hardware dates a piece before anything is removed. For a longer discussion of this decision specifically for furniture, our article on when to restore versus preserve original condition walks through more cases. The Victoria and Albert Museum publishes its own conservation case studies, which show how museum staff approach the same choices.

    Category-Specific Guidelines

    Furniture Restoration and Care

    Furniture requires careful consideration for antique identification preservation:

    • Never Restore:
      • Original finish in good condition
      • Signed or labeled pieces
      • Museum-quality examples
      • Rare forms or makers
      • Original paint or decoration
    • Conservative Restoration OK:
      • Structural repairs for stability
      • Replacing broken parts with period-appropriate materials
      • Cleaning and waxing
      • Tightening loose joints
      • Missing hardware replacement
    • Full Restoration Acceptable:
      • Water or fire damage
      • Previous poor restoration
      • Common pieces for daily use
      • No original finish remaining
      • Painted when should be natural

    Silver and Metal Objects

    Metal care affects antique appraisal app values significantly:

    • Proper Cleaning:
      • Use appropriate polishes only
      • Never use abrasives
      • Preserve hallmarks
      • Maintain some tarnish in crevices
      • Document before and after
    • Repair Considerations:
      • Professional silversmith only
      • Match original techniques
      • Preserve maker’s marks
      • Document all repairs
      • Consider leaving small dents
    • Bronze and Brass:
      • Never remove patina
      • Verdigris may be desirable
      • Lacquer controversial
      • Wax preferred protection
      • Research specific alloys

    Ceramics and Glass

    Fragile materials require special expertise:

    • Cleaning Methods:
      • Warm water and mild soap
      • Soft brushes only
      • No ultrasonic cleaners
      • Test small areas first
      • Air dry completely
    • Repair Philosophy:
      • Museum-quality repairs invisible
      • Collector repairs visible but neat
      • Structural integrity paramount
      • Reversible adhesives preferred
      • Color matching critical
    • Never Attempt:
      • Regilding without expertise
      • Removing stains with bleach
      • Filing chips smooth
      • Repainting decoration
      • Using superglue

    Textiles and Fabrics

    Textile conservation requires specialized knowledge:

    • Cleaning Approaches:
      • Vacuum through screen
      • Test colorfastness
      • Distilled water only
      • Flat drying essential
      • No machine washing
    • Storage Methods:
      • Acid-free materials
      • Roll don’t fold
      • Muslin covers
      • Cedar for moths
      • Climate control critical
    • Conservation Options:
      • Support fragile areas
      • Netting overlays
      • Minimal stitching
      • Document all work
      • Maintain original elements

    Professional Cleaning Techniques

    Safe Cleaning Products

    Products that won’t harm value:

    • Wood Furniture:
      • Mineral spirits for grime
      • Paste wax for protection
      • 0000 steel wool with wax
      • Murphy’s Oil Soap diluted
      • Renaissance Wax for museums
    • Metals:
      • Wright’s Silver Cream
      • Goddard’s Silver Polish
      • Simichrome for brass
      • Naval Jelly for rust (careful!)
      • WD-40 for mechanisms
    • Glass and Ceramics:
      • Dawn dish soap
      • Denture tablets for stains
      • White vinegar for deposits
      • Ammonia for grease
      • Alcohol for adhesive

    Tools and Equipment

    Professional conservation tools:

    • Basic Kit:
      • Soft natural bristle brushes
      • Microfiber cloths
      • Cotton swabs
      • Distilled water
      • pH testing strips
    • Advanced Tools:
      • HEPA vacuum with controls
      • Ultrasonic cleaner (selective use)
      • Steam cleaner (low pressure)
      • UV light for examination
      • Magnification equipment
    • Safety Equipment:
      • Nitrile gloves
      • Safety glasses
      • Dust masks
      • Ventilation fans
      • First aid kit

    Common Restoration Mistakes That Destroy Value

    Furniture Disasters

    Mistakes that cost thousands:

    • Refinishing Originals:
      • Stripping original finish = -70% value
      • Sanding through veneer = irreversible
      • Wrong stain color = obvious repair
      • Polyurethane on antiques = amateur
      • Painting over patina = value destroyer
    • Hardware Mistakes:
      • Replacing original hardware = -30% value
      • Polishing brass too much = removes patina
      • Using wrong period hardware = obvious
      • Filling old screw holes = evidence lost
      • Modern screws visible = amateur repair

    Ceramic and Glass Errors

    Irreversible damage to avoid:

    • Cleaning Catastrophes:
      • Dishwasher = crazing and fading
      • Bleach = permanent discoloration
      • Abrasives = scratch patterns
      • Hot water = thermal shock
      • Ultrasonic = loosens repairs
    • Repair Mistakes:
      • Superglue = irreversible yellowing
      • Epoxy overflow = impossible to remove
      • Wrong adhesive = future failure
      • Overfilling chips = obvious repair
      • Mismatched colors = decreased value

    When to Call Professionals

    Signs You Need Expert Help

    Know your limitations:

    • Complexity Indicators:
      • Value exceeds $1,000
      • Structural damage present
      • Missing significant parts
      • Previous bad repairs
      • Unknown materials
    • Specialty Requirements:
      • Gilding or gold leaf
      • Marquetry or inlay
      • Upholstery with original fabric
      • Clock or watch movements
      • Musical instruments
    • Risk Factors:
      • One-of-a-kind items
      • Museum-quality pieces
      • Sentimental irreplaceable
      • Insurance claims pending
      • Future sale planned

    Finding Qualified Conservators

    Locating the right professional:

    • Credentials to Seek:
      • AIC membership (American Institute for Conservation)
      • Professional training certificates
      • Specialization in your item type
      • Insurance coverage
      • References available
    • Red Flags:
      • No written estimates
      • Won’t explain process
      • Guarantees specific values
      • Rush to start work
      • No documentation provided
    • Cost Considerations:
      • $75-150/hour typical
      • Minimum fees common
      • Materials additional
      • Insurance may cover
      • Tax deductible if donated

    How do you learn about antique restoration without ruining a piece while practicing? Start with reading before tools: the Wikipedia overview of conservation and restoration of cultural property explains the ethics and vocabulary conservators use, and museum conservation departments publish treatment stories that show real decisions being made. Then practice on pieces with no originality premium: flea-market chairs, already-stripped dressers, chipped transfer-printed plates. Community college furniture programs and AIC public workshops teach the reversible techniques described above; formal conservation training is a graduate degree, usually two to three years.

    DIY Conservation Projects

    Safe Projects for Beginners

    What you can do yourself:

    • Furniture:
      • Cleaning with mineral spirits
      • Applying paste wax
      • Tightening loose screws
      • Lubricating drawers
      • Replacing felt pads
    • Silver:
      • Gentle polishing
      • Removing light tarnish
      • Washing and drying
      • Applying anti-tarnish strips
      • Proper storage setup
    • Textiles:
      • Gentle vacuuming
      • Airing outside
      • Freezing for pests
      • Rolling for storage
      • Making storage boxes

    Step-by-Step Furniture Cleaning

    Safe process for most wooden antiques:

    1. Assessment:
      • Photograph all angles
      • Note existing damage
      • Test finish type
      • Check for loose parts
      • Document marks
    2. Dusting:
      • Soft brush first
      • Vacuum with brush attachment
      • Cotton swabs for crevices
      • Compressed air for gaps
      • Tack cloth finish
    3. Cleaning:
      • Mineral spirits on cloth
      • Small sections at a time
      • With grain direction
      • Change cloths frequently
      • Let dry completely
    4. Waxing:
      • Apply thin coat
      • Let dry 20 minutes
      • Buff with soft cloth
      • Repeat if needed
      • Final buff to shine

    Storage and Environmental Control

    Optimal Conditions by Material

    Preventing deterioration through environment:

    • Wood:
      • 45-55% relative humidity
      • 65-70°F temperature
      • Avoid direct sunlight
      • Good air circulation
      • Stable conditions crucial
    • Metals:
      • Below 35% humidity
      • Cool temperatures
      • Silica gel packets
      • Anti-tarnish strips
      • Sealed containers best
    • Textiles:
      • 50-55% humidity
      • 60-65°F ideal
      • Dark storage
      • Acid-free materials
      • Pest monitoring essential
    • Paper:
      • 30-50% humidity
      • Below 70°F
      • Darkness required
      • Flat storage preferred
      • Archival folders only

    Storage Solutions

    Protecting your collection:

    • Furniture:
      • Climate-controlled room
      • Furniture pads for stacking
      • Dust covers breathable
      • Raise off floor
      • Avoid basements/attics
    • Small Objects:
      • Archival boxes
      • Tissue paper wrapping
      • Compartmented trays
      • Labels outside only
      • Inventory system

    Documentation and Insurance

    Creating Conservation Records

    Essential documentation for value:

    • Before Treatment:
      • Overall photographs
      • Detail shots of damage
      • Measurements recorded
      • Materials identified
      • Condition report written
    • During Process:
      • Step-by-step photos
      • Products used listed
      • Time spent noted
      • Unexpected findings
      • Changes documented
    • After Completion:
      • Final photography
      • Treatment summary
      • Care instructions
      • Future recommendations
      • Cost breakdown

    Insurance Considerations

    Protecting your investment:

    • Coverage Types:
      • Scheduled items specifically
      • Blanket coverage amounts
      • Agreed value policies
      • Replacement cost coverage
      • Conservation coverage
    • Documentation Needed:

    Market Impact of Restoration Decisions

    How Condition Affects Value

    Understanding market preferences:

    • Increases Value:
      • Professional conservation
      • Stabilized condition
      • Documented treatment
      • Reversible repairs
      • Maintained patina
    • Decreases Value:
      • Over-restoration
      • Replaced original parts
      • Refinished surfaces
      • Amateur repairs
      • Lost authenticity
    • Market Specific:
      • Collectors prefer original
      • Decorators want perfect
      • Museums need authentic
      • Users want functional
      • Investors seek untouched

    Does Restoring an Antique Decrease Its Value?

    Yes, in most cases restoration lowers what a collector will pay, while conservation holds or raises it. The reason is simple: buyers of antiques pay for original material and honest age, and restoration replaces both with new finish, new parts and a surface that no longer shows its history. The exceptions are pieces that were already stripped, damaged beyond stability, or so common that originality carries no premium. The table below shows how the three approaches usually play out by situation.

    SituationBest approachUsual effect on resale value
    Original finish intact, stable, some wearLeave as-is, clean onlyHolds full value; patina is part of the price
    Original finish but loose joints or lifting veneerConservation (reversible glue, no refinishing)Holds value; documented work reassures buyers
    Later overpaint hiding original decorationProfessional conservation (test, then remove layer by layer)Often rises once the original surface is confirmed
    Finish already stripped by a previous ownerSympathetic restoration with a period-appropriate finishSmall gain in saleability; the originality premium is already gone
    Common mass-produced piece for daily useRestoration acceptableLittle change either way; decorators may pay more
    Rare, signed or museum-grade exampleConservation only, with a treatment reportAny restoration can cost a large share of the premium

    Should you do minor restoration before selling? Usually no, unless the flaw stops the piece from functioning or your buyers are decorators rather than collectors. Tightening a wobbly leg, waxing a dry surface or replacing a missing screw with a period-correct one rarely hurts. Refinishing, repainting, swapping hardware or polishing away patina to make a listing photo look better is where sellers lose money. Auction specialists and museum conservators apply the same principle: every intervention should be documented and, where possible, reversible, which is the standard described by the Smithsonian Museum Conservation Institute. If you are unsure which market your piece belongs to, a dealer’s pricing framework helps you decide whether the collector premium is worth protecting, and these five quick signs tell you whether an originality premium exists at all.

    Quick Reference: Restoration Decision Tree

    Decision Checklist

    • ✓ Is the item rare or valuable? → Conservation only
    • ✓ Is original finish intact? → Preserve as-is
    • ✓ Will you use it daily? → Consider restoration
    • ✓ Is it signed or documented? → Minimal intervention
    • ✓ Is damage affecting structure? → Professional repair
    • ✓ Is patina desirable? → Clean only
    • ✓ Planning to sell? → Research market preference
    • ✓ Insurance claim? → Document everything
    • ✓ Family heirloom? → Conservative approach
    • ✓ Investment piece? → Professional consultation

    What is the value of antique care measured in money? Prevention is the cheapest treatment there is. A humidifier, UV film on a window and acid-free tissue cost a fraction of one conservator’s hourly rate, and they prevent the cracked veneer, faded textiles and tarnish pitting that later require paid work. Care also protects the paperwork side of value: a piece with a stable condition history and dated photographs is easier to insure and easier to sell, whether the figure comes from an online or in-person appraisal or from a professional appraiser rather than an app.

    Conclusion: Preserving Value Through Informed Decisions

    The choice between restoration and conservation fundamentally affects an antique’s value, authenticity, and future. While restoration might make an item more usable or attractive for daily life, it often destroys the very characteristics that make antiques valuable to collectors and museums. Conservation, though more expensive initially, preserves both monetary and historical value.

    Remember that every antique is unique, and decisions should be based on individual circumstances, market preferences, and personal goals. When in doubt, consult professionals and err on the side of conservation. The patina and wear that might tempt you to restore are often exactly what experienced collectors seek. By understanding these principles and applying appropriate care techniques, you protect your investment while preserving irreplaceable pieces of history for future generations.
  • Estate Sales & Auctions: Complete Guide to Finding Valuable Antiques

    Estate Sales & Auctions: Complete Guide to Finding Valuable Antiques

    Antique Identifier app - free download, no signup required

    The Hidden World of Estate Sales and Auctions

    Estate sales and auctions remain the best-kept secret for finding valuable antiques at below-market prices. These venues offer unique opportunities to discover authentic pieces with documented provenance, often selling for fractions of retail value. Whether you’re wondering “what is my antique worth” or searching for additions to your collection, understanding the estate sale and auction ecosystem is crucial for success. This insider’s guide reveals professional strategies for navigating these treasure-filled venues.

    Understanding Estate Sales vs. Auctions

    For quick AI-based style recognition and valuation, try the Antique Identifier Veritas app — includes a 3-day free trial.

    Estate Sales: The Intimate Treasure Hunt

    Estate sales offer direct access to lifetime collections:

    • Format: Fixed prices with negotiation potential
      • Walk through actual homes
      • Touch and examine items
      • Buy immediately
      • Prices typically marked
    • Advantages:
      • See items in context
      • Find overlooked treasures
      • Negotiate directly
      • No buyer’s premiums
      • Take items same day
    • Best For:
      • Furniture and large pieces
      • Complete sets and collections
      • Household decorative items
      • Books and ephemera
      • Garden antiques

    Auctions: The Competitive Marketplace

    Auctions provide access to curated, authenticated pieces:

    • Format: Competitive bidding system
      • Preview periods for inspection
      • Cataloged with descriptions
      • Set bidding increments
      • Final hammer price
    • Advantages:
      • Professional authentication
      • Detailed condition reports
      • Market-driven pricing
      • Online bidding options
      • Prestigious provenance
    • Best For:
      • Fine art and paintings
      • Rare collectibles
      • Jewelry and watches
      • Investment pieces
      • Museum-quality items

    Pre-Sale Research: Your Competitive Edge

    Finding the Best Sales

    Locating prime estate sales and auctions:

    • Online Resources:
      • EstateSales.net – Comprehensive listings
      • EstateSale.com – Photos and details
      • AuctionZip – Local auction calendars
      • LiveAuctioneers – Online bidding platform
      • Craigslist – Independent sales
    • Local Sources:
      • Newspaper classified sections
      • Estate sale company mailing lists
      • Auction house catalogs
      • Antique dealer networks
      • Social media groups
    • Red Flags to Avoid:
      • No preview photos
      • Vague descriptions
      • Unknown companies
      • Cash only requirements
      • No return policies

    Evaluating Sale Quality

    Signs of a promising sale:

    • Estate Indicators:
      • Older homes in established neighborhoods
      • Long-term single owner
      • Professional/collector backgrounds
      • No previous sales
      • Full house contents
    • Photo Analysis:
      • Quality furniture visible
      • Organized, clean presentation
      • Variety of periods represented
      • Original art on walls
      • Filled china cabinets
    • Company Reputation:
      • Years in business
      • Online reviews
      • Professional associations
      • Return customers
      • Detailed sale descriptions

    Estate Sale Strategies: Timing and Tactics

    The Early Bird Strategy

    Arriving early for best selection:

    • Night Before Preparation:
      • Study online photos thoroughly
      • Make target item list
      • Research comparable values
      • Plan room-by-room route
      • Prepare cash and supplies
    • Morning Arrival:
      • Arrive 30-60 minutes early
      • Sign up for number if offered
      • Chat with other buyers
      • Observe staff for insights
      • Stay warm and comfortable
    • First Minutes Inside:
      • Go straight to priority items
      • Claim with “sold” stickers
      • Move systematically
      • Don’t second-guess decisions
      • Secure payment quickly

    The Late Arrival Advantage

    Finding deals at sale’s end:

    • Final Day Benefits:
      • 50% off common on last day
      • Bundle deals available
      • Negotiation flexibility increases
      • Staff eager to clear out
      • Make offers on unsold items
    • What Remains:
      • Overlooked small items
      • Things needing repair
      • Incomplete sets
      • Heavy furniture
      • Boxes and containers unopened
    • Negotiation Tactics:
      • Bundle multiple items
      • Point out condition issues
      • Offer to clear entire rooms
      • Cash talks louder
      • Be respectful but firm

    Auction Success Strategies

    Pre-Auction Preparation

    Essential steps before bidding:

    • Catalog Study:
      • Read all lot descriptions
      • Note condition issues
      • Check dimensions carefully
      • Understand terms
      • Mark lots of interest
    • Preview Attendance:
      • Examine items personally
      • Check for hidden damage
      • Verify authenticity markers
      • Test functionality
      • Take detailed photos
    • Value Research:
      • For quick AI-based style recognition and valuation, try the Antique Identifier Veritas app — includes a 3-day free trial.
      • Factor in buyer’s premium
      • Consider restoration costs
      • Account for shipping
      • Set absolute maximum bids
    • Registration Process:
      • Register early online
      • Understand payment terms
      • Know pickup deadlines
      • Arrange shipping if needed
      • Get paddle number

    Bidding Psychology and Strategy

    Professional bidding techniques:

    • Opening Bid Decisions:
      • Start low to test interest
      • Jump bid to discourage others
      • Wait for momentum to slow
      • Enter late to surprise
      • Show confidence early
    • Incremental Strategies:
      • Stick to standard increments
      • Odd numbers can win
      • Don’t reveal maximum
      • Pause before raising
      • Watch competing bidders
    • Psychological Tactics:
      • Maintain poker face
      • Don’t look eager
      • Bid confidently
      • Know when to walk away
      • Don’t get emotional
    • Online vs. Live:
      • Online removes emotion
      • Set maximum bids online
      • Live allows reading room
      • Phone bidding for high-value
      • Absentee bids for discipline

    Spotting Overlooked Treasures

    Commonly Missed Valuable Items

    What others overlook can be your gain:

    • Small But Valuable:
      • Sterling silver in junk jewelry
      • Gold-filled watch cases
      • Signed costume jewelry
      • First edition books
      • Vintage fountain pens
      • Early photographs
    • Misidentified Items:
      • Art glass labeled as “vase”
      • Designer pieces unmarked
      • Period furniture as “old”
      • Original art as prints
      • Antique tools in garage
    • Hidden Gems:
      • Contents of drawers
      • Items behind furniture
      • Attic and basement boxes
      • Inside books and albums
      • Wrapped in newspaper
    • Condition Challenged:
      • Dirty paintings
      • Tarnished silver
      • Furniture needing refinishing
      • Incomplete sets
      • Items missing parts

    Quick Identification Tips

    Fast ways to spot quality:

    • Weight Test:
      • Heavy usually means quality
      • Solid wood vs. particle board
      • Cast iron vs. aluminum
      • Crystal vs. glass
      • Sterling vs. plated
    • Construction Clues:
      • Dovetail joints = quality
      • Hand-forged nails = age
      • Wavy glass = antique
      • Wear patterns = authentic
      • Patina = original finish
    • Maker’s Marks:
      • Always check bottoms
      • Look inside drawers
      • Under removable parts
      • Back of paintings
      • Inside covers of books

    Negotiation Masterclass

    Estate Sale Negotiation

    Getting the best prices:

    • Opening Approaches:
      • “What’s your best price?”
      • “Would you consider…?”
      • “If I buy multiple items…”
      • “I see some condition issues…”
      • “Cash today for…”
    • Leverage Points:
      • Condition problems
      • Multiple purchases
      • End of sale timing
      • Large/difficult items
      • Incomplete sets
    • When Not to Negotiate:
      • First hour of sale
      • Clearly underpriced items
      • High demand pieces
      • When others are waiting
      • Already marked down

    Post-Auction Opportunities

    Deals after the hammer falls:

    • Passed Lots:
      • Items not meeting reserve
      • Negotiate with house
      • Often 70-80% of estimate
      • No competition
      • Immediate purchase
    • After-Sale:
      • Unsold lots available
      • Make offers
      • Bundle for discounts
      • Avoid buyer’s premium
      • Private treaty sales

    Essential Tools and Supplies

    Your Estate Sale Kit

    What to bring for success:

    • Inspection Tools:
      • Jeweler’s loupe (10x)
      • UV flashlight
      • Magnet for metal testing
      • Measuring tape
      • Small mirror
    • Documentation:
      • Smartphone for photos
      • Price guide app
      • Notebook and pen
      • Business cards
      • Want list
    • Practical Items:
      • Cash in small bills
      • Boxes and wrapping
      • Hand truck or dolly
      • Cleaning supplies
      • Comfortable shoes

    Building Relationships for Long-term Success

    Networking with Professionals

    Creating valuable connections:

    • Estate Sale Companies:
      • Get on preview lists
      • Become preferred buyer
      • Offer to buy remainders
      • Provide referrals
      • Share expertise
    • Auctioneers:
      • Attend regularly
      • Pay promptly
      • Follow house rules
      • Consign occasionally
      • Recommend to others
    • Fellow Collectors:
      • Share information
      • Trade specialties
      • Alert to good sales
      • Split large lots
      • Respect territories

    Legal and Ethical Considerations

    Understanding Your Rights

    Legal aspects to know:

    • Purchase Terms:
      • All sales typically final
      • As-is condition
      • Review return policies
      • Get receipts always
      • Understand guarantees
    • Payment Methods:
      • Cash preferred
      • Check policies vary
      • Credit card fees
      • Payment deadlines
      • Deposit requirements
    • Removal Requirements:
      • Pickup deadlines strict
      • Storage fees apply
      • Bring own labor
      • Damage responsibility
      • Insurance coverage

    Ethical Guidelines

    Maintaining integrity:

    • Do:
      • Respect the estate
      • Follow house rules
      • Honor your bids
      • Pay promptly
      • Share knowledge appropriately
    • Don’t:
      • Hide items
      • Switch price tags
      • Damage to reduce price
      • Mislead other buyers
      • Violate preview rules

    Online Estate Sales and Auctions

    Digital Opportunities

    Expanding your reach online:

    • Platforms:
      • LiveAuctioneers – Major auction houses
      • Invaluable – International reach
      • HiBid – Regional auctioneers
      • Everything But The House – Estate sales
      • MaxSold – Local downsizing
    • Online Advantages:
      • No geographic limits
      • Bid from home
      • More time to research
      • Automatic bidding
      • Track multiple sales
    • Online Challenges:
      • Can’t inspect personally
      • Shipping costs high
      • Condition uncertainty
      • Technical glitches
      • Time zone confusion

    Maximizing Your Finds

    Quick Valuation Methods

    Instant antique valuation techniques:

    • On-Site Research:
      • Use smartphone apps
      • Check sold prices online
      • Photo for later research
      • Ask other collectors
      • Trust your instincts
    • Post-Purchase:
      • Deep research at home
      • Get professional appraisal
      • Clean and restore carefully
      • Document provenance
      • Consider best selling venue

    Seasonal Strategies

    Timing your treasure hunting:

    • Spring (Peak Season):
      • Most sales occur
      • Best selection
      • Higher competition
      • Weather favorable
      • Prices stronger
    • Summer:
      • Outdoor sales common
      • Vacation area opportunities
      • Garden antiques available
      • Heat reduces attendance
      • Holiday weekend sales
    • Fall:
      • Quality improves
      • Collectors return
      • Holiday decorations
      • End of season deals
      • Weather still good
    • Winter:
      • Fewer sales but less competition
      • Motivated sellers
      • Indoor venues only
      • Post-holiday estates
      • Best negotiation potential

    Quick Reference: Estate Sale and Auction Checklist

    Essential Checklist for Success

    • ✓ Research sales in advance online
    • ✓ Create target list with values
    • ✓ Arrive early or strategically late
    • ✓ Bring inspection tools and cash
    • ✓ Examine items thoroughly
    • ✓ Check for makers’ marks
    • ✓ Set maximum prices beforehand
    • ✓ Negotiate respectfully
    • ✓ Get receipts for everything
    • ✓ Remove purchases promptly
    • ✓ Build relationships for future
    • ✓ Research finds thoroughly at home

    Conclusion: Becoming an Estate Sale and Auction Expert

    Success at estate sales and auctions combines preparation, knowledge, and strategy. These venues offer unparalleled opportunities to find authentic antiques with verified provenance at fair market prices. Whether you’re building a collection, searching for inventory, or hunting for that one special piece, mastering these venues opens doors to treasures others miss.

    Remember that every sale is different, and experience is your best teacher. Start with smaller sales to build confidence, develop your eye for quality, and establish relationships within the community. With time, you’ll develop instincts for recognizing value, understanding pricing dynamics, and knowing when to bid and when to walk away. The thrill of discovery and the satisfaction of securing a treasure at a fair price make estate sales and auctions an endlessly rewarding pursuit.

    Happy hunting!

  • Antique Marks & Signatures Guide

    Antique Marks & Signatures Guide

    A mark narrows an antique’s maker, country and date, but on its own it is not proof of authenticity: marks are the easiest part of any piece to fake.

    This guide is published by Antique Identifier – Antiqly, which makes a photo identification app that is free to download on iPhone and free on Android with no sign-up, and it was last updated on 17 September 2026. It is a review of the published sources linked in the text — the Goldsmiths’ Company Assay Office in London, the Sheffield Assay Office, The National Archives, UK hallmarking law and the US import marking rules — and not a hands-on test: no object was examined for it, and it puts no value on any individual mark. Where a figure would need a dated, comparable sale behind it, this guide sends you to the records instead of inventing a range.

    What a mark can and cannot tell you

    A mark is evidence, not a verdict. It answers some questions well, answers others only partly, and answers the two questions collectors most want settled — is it real, and what is it worth — not at all. Knowing where that line falls is the whole skill, so it is worth fixing before the families of marks are worked through one by one.

    The question you are asking What the mark by itself gives you What still has to be checked
    Who made this? The name, initials or symbol of whoever registered the mark Whether that party made the piece or only sent it in
    Where was it made? The town or country that the marking system required Whether the mark records manufacture, testing or import
    When was it made? A window, from a date letter, a registered design mark or a change in wording Whether the mark was applied later than the object
    Is it authentic? Nothing on its own Wear, construction, the placement of the mark and an independent register
    What is it worth? Nothing on its own Dated sales of comparable pieces carrying the same mark variant

    The first row is the one most identification guides get wrong, and the offices that strike the marks are blunt about it. The Sheffield Assay Office says of the sponsor’s mark — what older books call the maker’s mark — that it “will only tell you who registered the mark and submitted the item to be tested and hallmarked – which is not always the same thing as the manufacturer of the item”. British design registration has the same gap: The National Archives records that the proprietor named in a registered design is “usually the manufacturer or retailer rather than the designer”. In both systems the mark names a business that took responsibility for the object, which is not the same as the hand that made it.

    The four families of marks and where to look

    Each material marks in its own way, in its own place, and gives up a different kind of date. Turn the piece over before anything else; on furniture, open it.

    Material Usual mark type Where to look first Strongest dating evidence it carries
    Pottery and porcelain Impressed, printed, painted or incised backstamp Base, foot rim, inside a lid or cover Factory mark variants, registry marks, country wording
    Silver and gold A group of struck punches Base, back of a spoon stem, under a handle, inside a lid Assay office punch read with the date letter
    Glass Acid-etched, engraved or moulded signature, or a paper label The base and pontil area, the underside of a foot Signature form and mould seams; labels rarely survive
    Furniture Branded, stamped or stencilled marks, or a paper label Inside drawers, under seat rails, on back boards Maker and retailer labels, read alongside the hardware

    For ceramics the mark is usually the most informative thing on the piece, which is why our guide to decoding a ceramic mark is organised by mark type and the earthenware and porcelain reference covers the body and glaze that have to agree with it. Silver is the opposite case: the metal itself is anonymous and the punches carry the record, so the British silver hallmarks chart and the American silver hallmarks guide are arranged by punch rather than by maker. Glass signatures are faint and easy to add after the fact, and the visual dictionary of glass marks and the French glass makers’ marks guide show what genuine ones look like at scale. Furniture is the hardest of the four, because most period furniture was never marked at all: furniture stamp identification and the alphabetical list of furniture makers’ marks cover what does turn up, and dating by hardware is usually the stronger evidence. For symbols that belong to none of the four, our marks and symbols guide is the wider index.

    British hallmarks: the one system built to be read

    British hallmarking is the most systematic marking scheme an ordinary collector will meet, and the place to learn what a mark can carry. Assay Office London, the Goldsmiths’ Company office, defines a hallmark as “a set of component marks applied to articles of the precious metals gold, silver, platinum or palladium” and says that it “Guarantees that it conforms to all legal standards of purity (fineness)”. Read that guarantee narrowly. It is about metal content, tested by an office; it says nothing about who made the object, how old the object is, or whether the piece around the punches is what it appears to be.

    Three marks are compulsory on a modern British hallmark: the sponsor’s mark, the assay office mark and the fineness mark. The date letter is now optional and “changes annually on January 1st”. On antique silver the group is usually larger, and each punch answers exactly one question.

    Punch What it records How to read it on an antique piece
    Sponsor’s or maker’s mark Initials in a shaped surround, registered with an office Names the registrant, not necessarily the workshop
    Standard mark That the metal met a legal standard The lion passant was added to English marks in 1544, so it sets a floor rather than a date
    Assay office mark Which office tested the piece The town symbols changed over time, so read it with the date letter
    Date letter The assay year Font, case and shield shape all matter; a letter alone is ambiguous
    Duty mark That the silver tax had been paid The monarch’s head, struck from 1784 until the tax was abolished in 1890

    Two of those rows carry traps. The English hallmarking system began with a statute of Edward I, so the English sterling statute dates from 1300 and anything claiming to be marked English sterling before it is claiming too much; and from 1697 there was also a higher standard of silver, known as the Britannia standard, with its own marks, so a piece that fails a sterling reading is not automatically wrong. The date letter is the other trap. It started as the mark of the Assay Master, “who was sworn in every May”, and it advanced when a new master was sworn rather than at New Year — which is why an antique date letter marks an assay year that straddles two calendar years, and why “1889” on a dealer’s ticket is shorthand rather than a date of manufacture.

    Which office, and why a rose is not always Sheffield

    There are four assay offices left in the UK — London, Birmingham, Sheffield and Edinburgh — and their town marks are the part of the hallmark that identification guides most often get wrong, this one included until now.

    Office Town mark on antique silver The detail that catches people out
    London Leopard’s head The oldest of the town marks, and still the office’s own emblem
    Birmingham Anchor The anchor no longer guarantees where a modern piece was assayed
    Sheffield Crown, on silver, until 1973 A rose on silver is a modern mark, not a Georgian or Victorian one
    Edinburgh Not asserted here; read it against the office’s own register Scottish standard marks differ from the English lion passant, so an English chart misreads Scottish silver

    Assay Office London states that the leopard’s head is the town mark for London. The Sheffield row is the correction this refresh owes its readers: earlier versions of this guide repeated the common shorthand that a rose means Sheffield. The office’s own record says otherwise for anything antique — “The Crown was used by Sheffield Assay Office to mark silver from 1773 until 1973” — and the rose took over on silver only when the crown was retired, so a rose struck on silver is a modern Sheffield mark, not a Georgian or Victorian one. Birmingham has drifted the other way: since the office began striking through an overseas subsidiary, its own history records that “The anchor mark no longer indicates that an item was assayed in Birmingham.” Marks do not stand still, which is why the register beats the symbol chart: the Sheffield Assay Office holds registers of sponsors’ marks going back to 1773 and will identify a Sheffield mark from a photograph.

    Dating clues that actually hold

    A few marks fix a date because the law, the registry or the technology behind them did not exist earlier. Those are worth memorising, because they set a floor that cannot be argued away. Everything else gives a range.

    Clue on the piece What it establishes Where the date comes from
    Diamond-shaped registry mark The design was registered between 1842 and 1883 brought into use with the 1842 Ornamental Designs Act and dropped once the 1883 Act replaced it
    Registered design number A registration from 1884 onward Numbered registrations continued, registered under the 1883 Patents, Trade Marks and Designs Act
    Country name in English on the base The piece was marked for an English-speaking import market US import law requires the country of origin in English
    Five-digit ZIP code in a printed address That printing is 1963 or later The five-digit ZIP Code was introduced on 1 July 1963
    Printed barcode That label or packaging is 1974 or later the first UPC-marked item was scanned at a retail checkout on 26 June 1974
    Monarch’s head duty mark British silver taxed between 1784 and 1890 The duty mark ran from 1784 until the tax was abolished in 1890

    Three cautions go with the table. A registry mark dates the design, not the object: a pattern registered in 1876 could be pressed for decades afterwards, and The National Archives adds that “As registration was not compulsory, there are many commercially produced designs which you will not find in our records”, so the absence of a registry mark proves nothing at all. The diamond mark itself was “printed, engraved or otherwise marked on an object”, most often on the underside of china, so it is easy to miss under a foot rim. And the two modern floors date the printing rather than the object: the five-digit ZIP Code arrived in 1963 and the first UPC barcode was scanned in 1974, so each fixes the age of a label, a box or a reprinted backstamp that may be decades younger than the piece it is attached to.

    “England” and “Made in England”: a rule of thumb, not a law

    The version of this rule that circulates among collectors — “England” alone means 1891 to 1920, “Made in England” means after 1920 — is tidier than anything this guide can trace to a statute, and it is treated here as trade shorthand rather than a dated legal boundary. What US law actually requires, under section 304 of the Tariff Act of 1930, is that an imported article be marked so as to indicate to an ultimate purchaser “the English name of the country of origin of the article, at the time of importation”. That is a rule about naming the country in English. It sets no day on which factories had to add the word “Made”, and in practice a pottery changed its backstamp when it cut a new printing plate, not when a tariff clerk asked. Use the wording as a soft indicator, then let the body, glaze and pattern carry the date.

    The same discipline applies to Chinese reign marks, where a mark is very often a mark of respect for an earlier emperor rather than a date of manufacture — our guides to the Kangxi reign mark and the Qianlong mark set out how apocryphal marks are read.

    Why the mark is the first thing a forger copies

    A mark is the smallest and softest part of an object to alter, and the law has treated it that way for a long time. The Hallmarking Act 1973 makes it an offence to make, with intent to defraud or deceive, “a counterfeit of any die or mark” — and, in the same section, to remove “any mark from an article of precious metal with intent to transpose it to any other article”. That second offence is the transposed hallmark, and it is the trap that catches careful buyers of antique silver: a genuine Georgian punch group cut out of a small, low-value piece and let into a larger, later one. The hallmark is real. The object carrying it is not.

    Porcelain has its own version, and it starts at the top of the market. Meissen’s crossed swords were introduced in 1720 and “used consistently after 1731 by official decree”, and “Variations in the logo allow approximate dating of the wares” — but the same account of the factory notes that in the eighteenth century “the mark was not considered important, and it was commonly painted on in a crude manner”. A crude eighteenth-century Meissen mark can therefore be right, and a crisp, carefully drawn one can be wrong, which is the reverse of what most checklists say. Our real versus fake crossed swords guide works through the variants and the imitators.

    Check a suspect mark in this order:

    1. Placement. Is the mark where that maker and that period actually put it? A mark in an unusual spot, or one that would have been awkward to apply during manufacture, is worth more suspicion than a mark that reads badly.
    2. Relationship to wear. A mark that sits on top of surface wear, or that is crisper than the wear around it, was applied after the object had a life.
    3. Relationship to the surface. On ceramics, whether the mark sits under or over the glaze narrows the period and the technique. On metal, a struck punch displaces material; a mark with no corresponding stress or distortion around it is not a struck mark.
    4. The rest of the object. Form, body, glaze, construction and hardware all have to agree with the mark’s date. When they disagree, the mark is the part that changed. Our guide to telling a real antique from a reproduction covers the rest of that reading.
    5. An independent register. Take the mark to the body that keeps the records rather than to a symbol chart, and compare against a photographed example of the same variant. Kovels is the standard printed and online marks dictionary for American and European wares; the assay offices identify their own punches.

    Retailer, decorator, import and registration marks

    Second marks are common and they are the ones most often misread as maker’s marks. A retailer’s stamp — a department store, a jeweller, a china dealer — records who sold the piece, and on silver it often sits beside the assay group without belonging to it. A decorating studio’s mark records who painted a blank that another factory made, which is why the mark on the base and the style of the painting can honestly point to two different firms. Import marks were added at the border and date the arrival of the object, not its manufacture. Registry marks, as above, date the design.

    None of these is a flaw. A full set of secondary marks is a provenance trail, and a piece that carries a maker, a retailer and a registry mark together is easier to place than one with a single stamp. The error is only to read a retailer or an importer as the maker. For signatures rather than punches — artists, silversmiths and studio potters — see our antique signature identification guide.

    What a marked piece is worth

    This is where mark guides usually stop being useful, because a premium gets quoted as a percentage with no sale behind it. Earlier versions of this page carried several such figures and a column of price ranges for famous makers. None of them had a source, and they are gone rather than replaced with different invented numbers.

    What can be said honestly is the mechanism. A mark makes a piece attributable, datable and easier to describe, and buyers pay for that certainty rather than for the stamp itself. How much, for a particular piece, depends on the maker, on which variant of the mark it is, on condition, and on how recent and how comparable the sale you are measuring against happens to be. That number has to come from records.

    Two routes get you a real one. Search completed sales for the same maker, form and period — WorthPoint and auction-house archives both index them — and check that the comparables carry the same mark variant and not merely the same name. Read those figures the way the sibling guides on this site do: a hammer price is a gross figure, and what reaches a seller is smaller once the buyer’s premium and the seller’s commission are accounted for, so a marked piece is not worth the headline number. Then, if the piece matters, commission a written appraisal from a credentialed appraiser through the International Society of Appraisers. Our guide to looking up antique values and the professional appraiser’s method walk through both routes in detail.

    A checklist for the mark in front of you

    1. Photograph the mark square-on, in raking light, with a ruler or a coin in frame for scale.
    2. Note exactly where it is, and what else is near it.
    3. Decide what kind of mark it is: impressed, printed, painted, incised, struck, etched, moulded or a label.
    4. Look for the other marks. Hallmarks travel in groups, and a single punch is rarely the whole record.
    5. Read the mark against the object: does the form, body, glaze, joinery or hardware agree with the date the mark suggests?
    6. Compare against a photographed example of the same variant, not a line drawing.
    7. Take it to the register that covers it — an assay office for British precious metal, a marks dictionary for ceramics and glass, a museum collection for a documented maker.
    8. Write down what you could not resolve. The unresolved part is what a specialist is for.

    Where a photo app fits

    An identification app is a fast first pass, not a substitute for the registers. Antiqly reads a photograph, suggests which family a mark probably belongs to and gives you a starting point for the reference you should check next; it is free to download on iPhone and free on Android, with no sign-up. It works from an image, so it cannot confirm that a mark was struck rather than added later, and it does not replace an assay office register or a written appraisal. For the longer comparison, see an app against a professional appraiser and the Antique Identifier app page.

    Frequently Asked Questions

    Can an app identify a maker’s mark from a photo?

    A photo app can narrow the field quickly. It compares the shape, lettering and layout of the mark against known patterns and tells you which family you are probably in — a British assay group, a printed factory backstamp, a registry mark, a retailer’s stamp — which is usually the step that takes a beginner longest. What it cannot do is confirm that the mark belongs to the object it is on, because that judgement needs the mark’s relationship to wear, glaze and construction, not its outline. Treat the result as a lead to check against a register.

    How do I identify a pottery or porcelain mark I don’t recognise?

    Photograph it square-on and decide first how it was applied: impressed into the clay, incised, painted, or printed. That single fact narrows the period before any name is read. Then compare against a specialist reference such as Kovels’ marks dictionary or Geoffrey Godden’s Encyclopaedia of British Pottery and Porcelain Marks, and check the body and glaze against what the mark claims. If the mark is a diamond or a registration number rather than a name, the date comes from the registry rather than the factory.

    What do British silver hallmarks tell you?

    A full group carries the sponsor who registered the mark, the standard the metal met, the office that tested it, the assay year and, between 1784 and 1890, that duty had been paid. Together those let you place a piece in a narrow window and trace it to a registered business. They do not tell you that the piece is entirely of that date: because punches can be transposed, a genuine group can sit on a later object, so the hallmark is read as one piece of evidence alongside the form, the construction and the wear.

    Can a fake mark fool a professional appraiser?

    Sophisticated work occasionally passes a first look. What catches most of it is not a better eye for the mark but the refusal to read the mark alone: magnification, ultraviolet light, X-ray fluorescence for metal content and provenance research are used together, and credentialed appraisers such as those listed by the International Society of Appraisers are trained to weigh them against each other. The common tells are a mark sitting above existing wear, letterforms that belong to the wrong period, and metal around a punch that shows no displacement.

    Does a mark always increase an antique’s value?

    No. A mark helps when it can be tied to a known maker and a known period, because it turns a guess into an attribution — and buyers pay for the certainty, not for the stamp. It does nothing when the mark is a retailer’s, an importer’s or an unrecorded workshop’s, and it actively hurts when it is wrong for the object, because a mark that does not fit makes the whole piece suspect. The size of any premium is a matter for comparable sales records rather than a rule.

    What does “Made in England” versus just “England” tell me about dating?

    Less than the shorthand suggests. US law required imported goods to name their country of origin in English, but no statute this guide can point to switched the required wording from “England” to “Made in England” on a set date, and factories changed backstamps when they replaced a plate. Treat the wording as a weak indicator that sits alongside the pattern, the body and any registry mark, rather than as a boundary between two decades.

    What to take away

    A mark is the fastest route into an object’s history and the least reliable single thing on it. It names a business that took responsibility for the piece, it often gives a usable date range, and on British precious metal it gives a legally tested statement about the metal. It does not, on its own, tell you that the object under it is genuine — and because it is the smallest thing to copy, it is the first thing that gets copied.

    So read the mark, then read against it. Ask whether the form, the body, the construction and the wear agree with what the mark claims, take the mark to the register rather than the symbol chart, and be willing to end with a range and an open question rather than a name. That is what the people who keep these records do, and it is the habit that keeps a mistake from becoming a purchase.

  • Antique Furniture Styles: Period Guide

    Antique Furniture Styles: Period Guide

    American furniture styles from 1620 to 1940 form a datable sequence, and each period is recognized by its legs and feet, woods, ornament and joinery.

    This guide is published by Antique Identifier – Antiqly, which makes a photo identification app that is free to download on iPhone and free on Android with no sign-up. It is a review of the published museum and reference sources linked in the text, mainly the Metropolitan Museum of Art’s essays on American furniture; no piece was examined for it and it quotes no prices. The dates are for high-style American production, and they overlap: a style reached Boston or Philadelphia years before it reached a country workshop, so treat every range as a centre rather than a boundary. For the same periods shown with photographs, see our visual guide to antique furniture styles, and for a one-page version, the printable furniture periods chart.

    Period table: American furniture styles, 1620–1940

    The table below gives each American style its approximate dates and the tells to look for, legs and feet first, then ornament and wood, so that a piece can be placed in a period before the sections that follow name the makers, pattern books and museum evidence behind each row.

    Style American dates Key tells: legs and feet, ornament, woods
    Seventeenth-Century (Pilgrim century) 1620–90 Straight oak members joined at right angles; low, horizontal and massive; low-relief carving, applied mouldings, turnings and paint
    William and Mary (Early Baroque) 1690–1730 Slender, vertical chairs on turned posts and legs; case pieces raised on turned legs; dovetailed cases; figured veneers; japanning begins
    Queen Anne (Late Baroque) 1730–60 Vase-shaped splat, S-curved cabriole legs, pad or slipper feet; restrained ornament; black walnut, often stained to look like mahogany
    Chippendale (Rococo) 1755–90 Square seat frames, straight stiles and flaring ears; pierced carved splats; claw-and-ball feet; Caribbean mahogany with naturalistic carving
    Federal (Neoclassical; Hepplewhite and Sheraton) about 1790–1815 Clean lines and geometric shapes; straight rather than curved legs; shield-shaped chair backs; contrasting veneers, inlays and eagle motifs
    Empire and Grecian (Greek Revival) about 1805–40 Three-dimensional classical ornament: carved figures, curule legs, columns with rope-twist carving, animal-paw feet; figured mahogany and rosewood veneers, applied brass, gilt stencilling
    Gothic Revival 1840s–70s Lancet (pointed) arches, trefoils and quatrefoils; formal high-backed chairs; favoured for libraries and dining rooms
    Rococo Revival (Modern French) 1840s–60s Curving, elaborately carved parlor suites; laminated rosewood shaped in steam moulds, then carved
    Renaissance Revival 1860s–70s Classical acanthus, anthemion and scroll motifs; coordinated parlor and bedroom suites; rosewood with incised and gilded decoration and mother-of-pearl medallions
    Eastlake (Modern Gothic) late 1870s–80s Rectilinear, angular and notched; geometric ornament, spindles, incised lines; oak and cherry, also ebonized factory wood
    Art Nouveau about 1895–1910 Organic forms from nature with asymmetrical curves and flourishes; mostly European production
    Arts and Crafts (Craftsman, Mission) 1897–1920s Rectilinear; honest construction, simple lines, exposed joinery; simply treated woods, typically oak
    Colonial Revival 1876–1940 and later Free interpretations of Queen Anne, Chippendale and Federal forms, often larger and exaggerated; factory and custom work
    Art Deco 1920s–30s Geometric forms; ornament of figures, animals, flowers, plants and abstract geometry; exotic woods, lacquer, sharkskin, ivory
    Early modernism and Streamline Moderne 1928–40 Undecorated geometric or aerodynamic forms; tubular steel, chrome, glass, plywood; Scandinavian wood from the mid-1930s

    Dates for the same styles differ between reference works, and the Victorian revivals in particular ran side by side rather than in sequence, which is why the table gives decades for them rather than single years.

    Seventeenth-Century and William and Mary styles, 1620–1730

    The earliest American furniture divides into two styles: the Seventeenth-Century style of 1620–90 and the Early Baroque, or William and Mary, style of 1690–1730, and the two are told apart by proportion and construction. The Metropolitan Museum’s essay on American furniture of 1620–1730 describes the first as furniture frequently made of straight oak members joined at right angles, sturdy and massive, with low, horizontal proportions, and explains that because the outlines were rigidly rectilinear, makers added interest with low-relief carving, applied mouldings and turnings, and paint. Two trades made it: joiners, who fitted straight sawn and planed wood together with rectangular mortise-and-tenon joints, and turners, who shaped parts on a lathe; the Met notes that turned chairs were cheaper than joined ones because their parts came quickly off the lathe and were held by simple round mortise-and-tenon joints. Very few of these makers can be named today, the Ipswich, Massachusetts, joiners William Searle and Thomas Dennis being the best documented.

    The William and Mary style broke with that horizontal massing. Chairs became more slender and vertically oriented, with tall backs and gracefully turned posts and legs, and case pieces were lifted off the floor on delicately turned legs. The new height was made possible by dovetailing, the joint in which case sides and fronts are fastened with interlocking pieces shaped like a dove’s tail; dovetails allowed thinner boards and lighter, more vertical construction. Veneers of highly figured wood were glued to case fronts and table tops for pattern and colour, and new specialized forms, dining tables, high chests, desks and easy chairs, appeared with the early eighteenth-century concern for comfort. The Met adds two cautions useful for dating: the style fell out of fashion in the 1720s, and outside the major port cities its influence was minimal, so a turned, veneered high chest is most likely a port-city product.

    Queen Anne and Chippendale styles, 1730–1790

    Queen Anne furniture is recognized by its curves and restraint, Chippendale by its carving and squarer chairs, and the two overlapped for decades. The Met’s essay on American furniture of 1730–1790 explains that the new style, variously called Late Baroque, Early Georgian or Queen Anne, blended Baroque, classical and Asian influences; by the 1730s Boston makers had developed a standard chair with a vase-shaped splat and S-curved cabriole legs, and Boston shipped thousands of these chairs to other colonies. Black walnut from Virginia and Pennsylvania was the most popular wood of the Queen Anne period (1730–60) and was often stained to resemble imported Caribbean mahogany, which became the wood of choice in the Chippendale, or Rococo, era (1755–90). Japanning, the Western imitation of Asian lacquer painted with chinoiserie scenes, began in the William and Mary years and stayed popular through the 1750s in Boston and New York. Our guide to antique chair leg styles shows the cabriole leg and its feet in detail.

    Thomas Chippendale’s The Gentleman and Cabinet-Maker’s Director of 1754 spread the French Rococo taste, but the Met is clear that Chippendale did not invent the richly carved style that now bears his name; he codified the English fashion for blends of Gothic, Asian and French Rococo design. In chairs, the style became more rectilinear, with square seat frames, straight stiles and outward-flaring ears at the top corners; claw-and-ball feet with sharply articulated talons replaced pad and slipper feet, and solid splats gave way to pierced, carved ones. In case furniture Chippendale was an extension of Queen Anne, so a Philadelphia high chest kept its Baroque form and gained carved Rococo ornament.

    Regional habits are part of the identification. Boston cabriole legs were somewhat stiff and vertical, while Newport makers favoured more curvilinear legs ending in pointed slipper feet and cut scrolls and scalloped shells into the skirts of high chests and dressing tables; Newport’s Townsend and Goddard families developed the block-and-shell case pieces that have no known parallel in European furniture. Philadelphia, the largest colonial city by the 1750s, produced the most lavish carved interiors and furniture; New York shops followed English forms such as the five-legged card table and the chest-on-chest; and New England makers generally relied on shaped facades rather than carving. The Met also warns that the change from Queen Anne to Chippendale was neither immediate nor universal: outside the major cities it was gradual, and gracefully curved pieces with restrained ornament continued to be produced well after the Revolution, so a plain cabriole-leg chair need not be as early as it looks.

    Federal and Empire styles, 1780s–1840s

    Federal furniture is flat, delicate and inlaid; Empire furniture is heavier, sculptural and mounted with brass, and the shift between them happened in the first decades of the nineteenth century. The Met’s essay on American Federal-era period rooms defines the Federal era as the three decades that followed the formation of the United States and traces its furniture to the English Neoclassical style publicized in George Hepplewhite’s Cabinet-Maker and Upholsterer’s Guide (1788) and Thomas Sheraton’s Cabinet-Maker and Upholsterer’s Drawing-Book (1793), both widely referenced by American cabinetmakers. The clean lines, delicate forms, geometric shapes, contrasting veneers and decorative inlays of Federal furniture were a dramatic shift away from the Rococo carving of the previous thirty years; the inlaid eagle in an oval at the top of a table leg, for example, is a motif common to Baltimore work. Hepplewhite and Sheraton are names for pattern books, not for separate American periods: the shield-shaped chair back is the feature most often linked to Hepplewhite’s designs, Federal legs are usually straight rather than curved, and American shops drew on both books in the same years.

    The Empire taste that followed is described in the same essay through the Richmond Room, whose New York tables and chairs follow an archaeologically correct antique taste that superseded the Neoclassical style and was strongly influenced by French design: motifs from Greece and Rome continued, but as three-dimensional carved figures or applied brass ornament rather than the flat inlay of the Federal style, and the curule or Grecian-cross leg is based on an ancient Roman magistrate’s folding chair. The Met’s essay on Duncan Phyfe and Charles-Honoré Lannuier names the two as the acknowledged leaders of the New York trade in those decades; Phyfe brought lyres, harps and fasces into his furniture, and because his career lasted through the 1840s his shop moved on to the Late Grecian, or Greek Revival, style and then to Rococo and Gothic Revival work. The most elaborate American Empire furniture was made around 1815–25, with columns with rope-twist carving, animal-paw feet and acanthus ornament, while the later, plainer Grecian pieces rely on curved forms, figured mahogany veneers and gilt stencilling. Lannuier trained in Paris and worked from the Directory style through the Consulate and Empire (1804–15) styles, and he labelled and stamped his pieces regularly, whereas Phyfe only rarely attached a trade label. That difference matters for attribution: few objects in the Phyfe style can be conclusively linked to him, and collectors’ interest around 1900 produced a large number of reproductions that still confuse the market, which is why our guide to Duncan Phyfe originals and reproductions treats the name as a style first and an attribution second.

    Victorian revival styles, 1840–1880s

    Victorian furniture is a parade of revival styles that ran side by side, so it is identified by its ornament and room type rather than by a single date. The Met’s essay on American revival styles, 1840–76 lists Greek Revival, Gothic Revival, Egyptian Revival, Rococo Revival, Renaissance Revival and Néo-Grec, all spread through portfolios, books and journals for cabinetmakers and the general reader, with Greek Revival architecture especially popular in the 1820s and 1830s. Rococo Revival was limited to interiors and furniture, was thought elegantly French and was the favourite for parlors, which held carved suites of two sofas, two armchairs, four side chairs in matching silk, a centre table and an étagère. The best-known maker, John Henry Belter of New York, is known for laminating rosewood in many layers into thin panels that were shaped in moulds with steam and then finely carved, a method widely copied in New York, Philadelphia and Boston, and the Met’s Rococo Revival Parlor shows his laminated and elaborately carved furniture, so a carved laminated back is a Rococo Revival signal rather than proof of Belter. Rooms had their own styles at mid-century, with the Gothic style favored for libraries and dining rooms and the Rococo Revival, also termed Modern French, preferred for parlors. Gothic Revival furniture, with its formal high-backed chairs and medieval references, was always considered preferable for libraries and also appears in dining rooms, and the Gothic villa itself was popularized by the architect Alexander Jackson Davis with Andrew Jackson Downing, whose Architecture of Country Houses (1850) prescribed styles room by room; Renaissance Revival suites furnished bedrooms and reception rooms; and no complete suites of Egyptian Revival furniture are known, so such pieces were occasional or highlight pieces. Our Victorian furniture identification guide goes through each revival with its typical forms.

    The Philadelphia Centennial Exposition of 1876 brought objects from around the world before American buyers, and for those who wanted to be thought artistic in the late 1870s and 1880s the favoured furniture was honest Modern Gothic oak, popularized by the British reformer Charles Locke Eastlake in Hints on Household Taste (English edition 1868, American edition 1872). The Eastlake movement as it played out in America was largely a factory phenomenon: manufacturers used the drawings and ideas in the book to create mass-produced Eastlake Style or Cottage furniture with geometric ornament, spindles, low-relief carving and incised lines designed to be affordable and easy to clean. Eastlake preferred oak and cherry, American makers also used ebonized wood, and Eastlake himself disowned what was sold under his name. After the 1870s, the Met notes, taste grew still more eclectic and styles were no longer prescribed for particular rooms, which is why late Victorian pieces often mix revival vocabularies.

    Art Nouveau, Arts and Crafts and Colonial Revival, 1890s–1920s

    Three currents ran together at the turn of the century: Art Nouveau curves, Arts and Crafts rectilinearity and Colonial Revival copies of eighteenth-century forms, and each is told by its outline. The Met’s survey of design from 1900 to 1925 places Art Nouveau in France and Belgium around the turn of the century, with organic forms inspired by nature and accentuated with asymmetrical curves or elaborate flourishes; the name comes from Siegfried Bing’s Parisian shop L’Art Nouveau, opened in 1895, and poor-quality mass production hastened the style’s demise after 1900. American furniture in this manner is uncommon, and most Art Nouveau furniture found in the United States is European.

    The Met’s essay on the Arts and Crafts movement in America dates the American movement from 1897, when Boston founded the first Society of Arts and Crafts in June and Chicago’s society began at Hull House in October. Gustav Stickley, founder of The United Crafts, later the Craftsman Workshops, set out to improve American taste through craftsman or mission furniture with designs governed by honest construction, simple lines and quality material, and published The Craftsman from 1901 to 1916. Related work ranges from the Byrdcliffe colony’s furniture, a study in rectilinearity, simply treated materials and minimal decoration, to Charles Rohlfs of Buffalo, who crafted individual pieces rather than using industrial methods, and Greene and Greene in California, whose Asian-influenced style reached its peak in the bungalow. By the 1920s machine-age modernity had ended the handcrafted phase of the movement. Because Stickley furniture is widely reproduced, a paper label or branded mark needs the checks described in our guide to maker’s marks on furniture.

    Colonial Revival is the style most often mistaken for the real thing. Its beginnings are usually attributed to the Centennial Exhibition of 1876, which reawakened Americans to their colonial past, and the movement was ascendant from 1910 to 1930, so a great deal of Queen Anne- and Chippendale-looking furniture in American homes was made between 1876 and 1940. The revival did not copy exactly: the term also covers decorative arts that emulate or draw inspiration from colonial forms, and revival houses and their furnishings tend to be larger than their prototypes and to exaggerate details. Construction, not outline, separates a 1760 chair from its 1920 descendant, as the identification steps below explain.

    Art Deco and early modernism, 1920–1940

    Art Deco is the ornamented, luxurious style named for the Paris exposition of 1925, and early modernism is its plain, industrial rival, so the two are separated by whether a piece decorates or refuses to. The Met’s French Art Deco essay explains that the Exposition Internationale des Arts Décoratifs et Industriels Modernes gave the style its name; the style had matured by 1925, having flourished after the First World War, and its commercial success kept designers and manufacturers across Europe promoting it well into the 1930s. Its most popular motifs are the human figure, animals, flowers and plants along with abstract geometric decoration, and French designers explored sharkskin, ivory, exotic woods, lacquering and ceramic glazes. The Met’s survey of design from 1925 to 1950 records how Deco waned as the Great Depression made its rich materials seem irrelevant, while the Bauhaus, founded in Weimar in 1919 and closed by the Nazis in 1933, trained the modernists who rejected ornament in favour of form, colour and texture. In the United States the American Designers’ Gallery opened in New York in 1928 with interiors by Ilonka Karasz, Joseph Urban and Donald Deskey, many of them using steel and chrome; Streamline Moderne added aerodynamic forms, and by the mid-1930s consumers turned with relief to the warmer wood-based organic design coming from Scandinavia.

    A practical point about the word antique applies to this last period. Under the common hundred-year rule discussed in our guide to antique versus vintage versus retro, furniture made in the late 1920s and the 1930s is not yet antique in 2026; it is collected as vintage design, and this guide includes it because the styles are part of the same sequence.

    How to identify a furniture style step by step

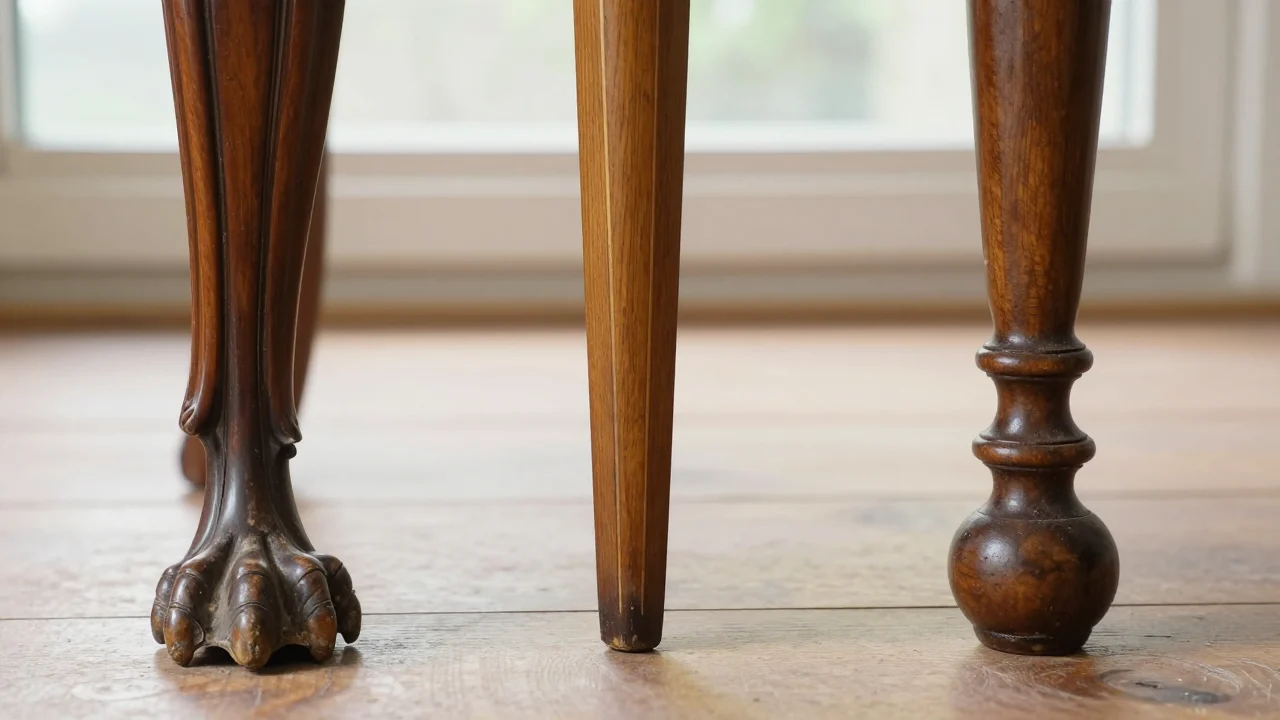
    Three antique chair legs in a row on a wooden floor: a carved cabriole leg ending in a claw foot, a slender square tapered leg with a light inlaid line and a ring-turned leg ending in a ball foot
    Three legs, three periods: a carved cabriole leg, here ending in a claw foot, belongs to the Queen Anne and Chippendale years; a square tapered leg with inlaid stringing to Federal; a ring-turned leg with a ball foot to William and Mary.

    Identify a style by reading the whole piece in a fixed order, form first and construction last, and let construction overrule style whenever the two disagree. Start with outline and proportion: horizontal and massive points to the seventeenth century or to Empire, tall and slender to William and Mary or Federal, curved to Queen Anne and Rococo Revival, square and plain to Arts and Crafts and modernism. Then read the legs and feet, which carry more period information than any other part: boldly turned legs for William and Mary, cabriole legs with pad or slipper feet for Queen Anne, cabriole legs with claw-and-ball feet for Chippendale, tapered or reeded legs for Federal, curule frames, columns and paw feet for Empire, and straight square legs for Arts and Crafts. Third, read the ornament and its technique: low-relief carving and paint on oak, figured veneer, japanning, naturalistic Rococo carving, flat inlay, applied brass, laminated and carved rosewood, incised Eastlake lines, exposed Mission joinery or Deco exotic veneers each belong to a narrow band of dates, and our guide to telling new wood from old patina shows how a surface itself ages.

    The last step decides the case. Pull a drawer and turn a chair over: dovetailed cases arrived with the William and Mary style, hand-cut dovetails are usually uneven in spacing and width while machine-cut ones are uniform, and the nails, screws and hinges give an earliest possible date that is documented in our guide to dating furniture by its hardware. Secondary woods, saw marks on unfinished surfaces, tool marks inside cases and the consistency of wear across the piece all belong to this step. Marks and labels come last, because labels were rare in the eighteenth century, Phyfe seldom used one, and later makers’ stamps are copied; treat a label as a lead to check, not a verdict. When you want a value for a piece you have dated, our guide to how appraisers determine antique value explains the steps, and our restoration versus preservation guide explains why the surface should be left alone until then.

    Common mistakes in dating furniture by style

    The commonest error is to read a revival as the period it imitates. Colonial Revival furniture of 1876–1940 reproduces Queen Anne, Chippendale and Federal forms, Phyfe’s designs were reproduced in quantity around 1900, and the Victorian revivals borrowed Gothic, Rococo and Renaissance ornament wholesale, so the outline of a piece sets only an earliest possible date; machine-uniform joinery, modern screws, plywood or wire nails move it forward. The second error is dating by one feature, because styles overlapped for decades: the Met records that curved Queen Anne forms continued to be produced well after the Revolution and that Phyfe’s own shop worked through Grecian, Rococo Revival and Gothic Revival phases, so a cabriole leg, a lyre or a pointed arch is a clue to be weighed with the rest. The third is ignoring region: Boston, Newport, Philadelphia and New York made recognizably different Queen Anne and Chippendale furniture, and a rural shop could lag a port city by a generation. The fourth is missing a marriage, a top and a base or a chair frame and its seat that started life apart; check that woods, colour, wear and construction agree across the whole piece before assigning a period.

    Where a photo identification app fits

    A photo identification app gives a quick first suggestion of style and period that you then verify with the steps above, and it is not a substitute for turning the piece over. Antiqly is our own app, so read this as the publisher’s view: it is free to download on iPhone and Android with no sign-up, and this article reports no test of it or of any other tool. Whatever you use, photograph the piece in daylight from the front and side, then add close-ups of a leg and foot, the carving or inlay, a drawer side with its dovetails, the hardware and any label or stamp, because those are the details that separate a period piece from a revival.

    Frequently asked questions

    Are Hepplewhite and Sheraton different periods?

    No. Both are names of English pattern books, Hepplewhite’s Guide of 1788 and Sheraton’s Drawing-Book of 1793, that American cabinetmakers used side by side during the Federal era, so the labels describe leg and chair-back types within one period rather than two successive ones.

    Did Thomas Chippendale make American Chippendale furniture?

    No. American Chippendale furniture was made in Boston, Newport, New York, Philadelphia and smaller towns by colonial cabinetmakers working from the taste that Chippendale’s 1754 Director codified; the Met notes that he did not invent the carved style that carries his name, so American Chippendale is a period and style label, not an attribution to his London workshop.

    Is Art Deco furniture antique?

    Mostly not yet, under the hundred-year rule most dealers use: only pieces made in 1926 or earlier have reached a century in 2026, so most Art Deco and all early modernist furniture is currently described as vintage design rather than antique, even though it belongs to the same sequence of styles.

  • How Appraisers Determine Antique Value

    How Appraisers Determine Antique Value

    Appraisers determine antique value by fixing the type of value needed, identifying the object, grading its condition and adjusting recent comparable sales.

    This guide is published by Antique Identifier – Antiqly, which makes a photo identification app that is free to download on iPhone and free on Android with no sign-up. The guide is a review of the published references linked in the text: no object was appraised and no tool was tested for it, and it quotes no prices for any kind of antique. It explains the method appraisers follow so that you can apply the same steps at home and know when the job needs a professional.

    What type of antique value do you need?

    The first question an appraiser asks is what the figure is for, because fair market value, replacement value and the money left after a sale are three different numbers for the same object. The IRS definition in Publication 561 is the standard one: FMV is the price that property would sell for on the open market. It is the price that would be agreed on between a willing buyer and a willing seller, with neither being required to act, and both having reasonable knowledge of the relevant facts. Replacement value looks the other way. The insurer Chubb’s collector’s guide to appraisals explains that replacement value is most often used for insurance on fine arts and collectibles and is the amount that would be required if you needed to replace the item with another of similar age, quality, origin, appearance, provenance, and condition within a reasonable length of time, in an appropriate and relevant market; an item would often need to be replaced in a retail setting instead of in a secondary market such as an auction, and because of these other factors, replacement value is higher than fair market value. The third figure is what a seller actually receives. Auction houses charge a buyer’s premium, which the history of that fee describes as a charge in addition to the hammer price, charged by the auctioneer in addition to the commission which has always been charged by auction houses to sellers, and all of the buyer’s premium is retained by the auction house and is not shared with the item’s seller. Our guide to identifying real and valuable antiques walks through the hammer-price arithmetic for a sale.

    Type of value Question it answers Evidence the appraiser uses Typical use
    Fair market value What would it sell for between a willing buyer and a willing seller? Completed sales of similar items in the market where such pieces usually change hands Tax and estate appraisals, and deciding whether to sell
    Replacement value What would it cost to replace it with a comparable piece within a reasonable time? Retail replacement prices, plus the fees, taxes and services that a replacement involves Insurance scheduling
    Net proceeds from a sale What will you actually receive? The hammer price or agreed price minus the seller’s commission and fees Deciding whether and where to sell

    Ask for the value type by name when you commission an appraisal, and read any figure you are given, including one from a website or an app, with the same question in mind: which of these three numbers is it, and for which market and date?

    How do appraisers identify what they are valuing?

    An appraiser cannot price an object until it has a name, a maker or origin, a date and a material, so identification comes before any number. The examination starts with the parts a buyer does not see: the base of a vase, the back of a spoon handle, the underside and drawer sides of a chest. Marks are the fastest lead, and our guides to where hallmarks and maker’s marks sit and what they mean, decoding ceramic marks and furniture maker’s marks show where to look. A mark is a lead rather than a verdict, because marks are the most copied feature of any antique; the red flags on faked silver hallmarks apply in spirit to every category. Construction is the second witness: saw marks, nails, screws and joints set an earliest likely date for a piece of furniture, as our guide to dating furniture by its hardware explains, and style places it in a period once the date is plausible, which is what the furniture period guide from 1600 to 1940 is for. Signatures on paintings, prints and silver are checked against reference examples rather than taken at face value; see antique signature identification.

    Provenance is part of identification, not a bonus. The Smithsonian American Art Museum’s first steps for researching a work begin with the question How long has the work belonged to you or your family? and the advice to check family records and interview relatives who might know something about the artwork. Receipts, old photographs showing the object in a room, auction labels and letters all count, and the same questions apply to a clock or a chest as to a painting.

    How does condition change the value?

    The front of an old wooden chest of drawers with one bright brass knob between two darker worn knobs
    Replaced hardware is one of the first things an appraiser looks for; a piece that has lost its original brasses is valued below an untouched one.

    Condition is graded against the best surviving examples of the same object, and originality counts as much as damage. The IRS guidance on art and collectibles states that the physical condition and extent of restoration are both relevant in determining the valuation of art and antiques, and gives the example of an antique in damaged condition lacking the original brasses, which may be worth much less than a similar piece in excellent condition. An appraiser therefore records every chip, crack, repair, replaced part, refinished surface and later addition, and asks whether the surface is the one the object left the workshop with. That is why cleaning and refinishing before an appraisal is a mistake: our guide to restoration versus conservation explains what an original surface is worth to a buyer, and the review of baking soda and foil silver cleaning shows how a home method can strip exactly the evidence an appraiser wants to see. Fresh surfaces are also a warning sign in the other direction; telling new wood from old patina covers the signs of a reproduction. One thing condition grading never includes is feeling: the same IRS publication notes that sentimental personal value has no effect on FMV.

    How do appraisers use comparable sales?

    Comparable sales are the evidence that turns an identified, graded object into a figure, and only completed sales count. Publication 561 says that the sales prices of properties similar to the donated property are often important in determining the FMV, and that the weight to be given to each sale depends on the degree of similarity, the time of the sale, the circumstances of the sale and the conditions of the market. The same publication warns about the other kind of number. Price lists and dealer catalogs are not always reliable indicators of FMV and should be supported by other evidence; for example, a dealer may sell an item for much less than is shown on a price list, particularly after the item has remained unsold for a long time. An auction result is stronger, but the price an item sold for in an auction may have been the result of a rigged sale, so one lot is never the whole story. Auction comparables also need reading correctly: the winning bidder is required to pay both the hammer price and the percentage of that price called for by the buyer’s premium, and databases and auction archives differ in whether the figure they publish is the hammer price alone or the hammer price with the premium added, so check which one you are looking at before setting it beside a shop price.

    In practice this means searching sold results rather than listings. Our guide to looking up antique values like an appraiser shows how to filter marketplaces and auction archives to completed sales, and our reviews of WorthPoint and Kovels explain what the two best-known price-history databases contain and what they charge. Whatever the source, note the sale date, the venue, the condition described in the lot notes and whether the figure includes the buyer’s premium.

    How is the final figure reached?

    The final figure is a judgement about which comparables are closest and how the object differs from them, written down with its date and market. An appraiser selects the sales that match the object best in maker, form, size, material and condition, sets aside outliers and results from unusual circumstances, adjusts for the differences that remain, such as a replaced part, a missing lid or a documented provenance, and states a figure for the value type requested. Timing matters as much as similarity: Publication 561 notes that because conditions in the market change, the cost or selling price of property may have less weight if the property was not bought or sold at a time that is reasonably close to the date of contribution, which is why a figure from an old price guide is a starting point at best. Our page on how experts estimate a price range shows how to build a defensible range for your own research before you hand the file to a professional. A professional delivers the result as a written report, and Chubb’s guide lists what a comprehensive one contains: the purpose of the appraisal, the type of valuation and its definition, the method of valuation and the market in which valuation is applied, a thorough description of objects including artist, origin, style, media, marks, signatures, measurements, age, condition, and provenance, a firm statement of value (not a valuation range) and valuation support including comparable examples, market analysis, and sources; the appraisal document should be printed, not handwritten, and should always be signed by the appraiser. Your own research can honestly end in a range, but a professional report commits to a figure and shows its evidence.

    When should you pay for a professional appraisal?

    Pay for a written appraisal when money, insurance, tax or a legal process depends on the figure, and use your own research for everything else. In the United States the IRS requires that a charitable contribution of art and collectibles for which you claim a deduction of more than $5,000 must be supported by a qualified appraisal and a Form 8283, and insurers, estates and courts have their own documentation rules. Museums will not do this job for you: the Smithsonian states that it does not, as a matter of policy, offer monetary evaluations and instead points enquirers to the American Society of Appraisers, the International Society of Appraisers and the Appraisers Association of America, each of which publishes a directory of its member appraisers. Chubb’s guide explains why the directories matter: there is no government regulation of appraisers, so the best way to find a qualified appraiser is through one of the major accredited appraisal organizations, whose members must complete courses and exams, and demonstrate years of experience and must strictly adhere to set ethical standards as outlined by USPAP, the Uniform Standards of Professional Appraisal Practice. Look for specialized expertise in the material being appraised, because an appraiser who specializes in contemporary art may not be the best choice to appraise an Impressionist painting, and ask how the fee is set before you agree: for a qualified appraisal the IRS rule is that generally, no part of the fee arrangement for a qualified appraisal can be based on a percentage of the appraised value of the property, and it also excludes from acting as the appraiser a party to the transaction in which the donor acquired the property being appraised. Hourly, flat and per-item fees are the normal basis, and someone who values an object while offering to buy it is a buyer, not an appraiser.

    For a decision between a phone-based estimate, an online service and a visit, our comparisons of an antique identifier app versus a professional appraiser and of online versus in-person appraisal set out what each can and cannot deliver.

    Where a photo identification app fits

    A photo identification app is a quick way to put a name, a period and a search term on an object, and its result is a lead to verify against sold prices and references, not an appraisal. Antiqly is our own app, so read this paragraph as the publisher’s view: it is free to download on iPhone and Android with no sign-up, and this article reports no test of it or of any other tool. Whatever you use, the photographs decide the result. Shoot in daylight from several angles, add close-ups of marks, joints, signatures and damage, include a ruler or a coin for scale, and photograph the base, the back and the inside as well as the front, because those are the surfaces an appraiser would examine first. Then take the suggestion through the steps above: confirm the identification against references, grade the condition yourself, find completed sales and decide which value type you need. Our guide to AI antique appraisal accuracy and limits explains what image recognition can and cannot see, and what’s my antique worth shows the research route from a photograph to a figure.

    A checklist before you ask for a figure

    • Decide which value you need: fair market value, replacement cost or the net proceeds of a sale.
    • Photograph and measure the object, including the base, back, inside and every mark, signature and repair.
    • Identify maker, origin, date and material from marks, construction and style, treating marks as leads.
    • Write down what you know of its history and keep receipts, photographs and letters with the object.
    • Grade condition honestly and leave the surface alone; do not clean, polish or refinish before an appraisal.
    • Collect completed sales of closely similar pieces with their dates, venues and condition notes; ignore asking prices.
    • Note whether each auction result includes the buyer’s premium and, if you plan to sell, what commission the venue charges.
    • State the figure with its value type, date and market, or hand the file to an accredited appraiser who charges by time, not by value.

    Frequently asked questions

    Why do two appraisals of the same antique give different figures?

    Because they may answer different questions. An insurance appraisal estimates replacement value in the retail market where you would have to buy again, an estate or donation appraisal uses fair market value from completed sales, and an auction estimate anticipates a hammer price in one saleroom on one date. Two honest reports of different types will differ; two reports of the same type, date and market should be close, and if they are not, ask each appraiser which comparables they used.

    Is a dealer’s offer the same as the value of my antique?

    No. A dealer’s offer is a purchase price that leaves room for the dealer’s costs and profit, so it sits below the price the dealer expects to achieve, and an auction house’s estimate is a forecast of the hammer price before its commission. Neither is an appraisal. As the Smithsonian’s own note on value puts it, prices asked and amounts offered are determined by personal interests of both seller and purchaser and by trends in the market, which is why an appraisal is done by someone with no stake in the sale.

    Can an antique be valued from a photograph?

    A photograph can identify an object and point to comparable sales, but it cannot supply weight, the feel of a surface, the inside of a joint or the difference between wear and distressing, so a figure based on photographs alone is an estimate that a hands-on examination can overturn. Use photo tools, including ours, to reach the right references faster, and treat condition and originality as unsettled until the object has been handled.

  • Guide to Identifying Valuable Antiques

    Guide to Identifying Valuable Antiques

    A valuable antique is more than 100 years old, built and worn as its period predicts, still in original condition, and like pieces that have recently sold.

    This guide, published by Antique Identifier – Antiqly, works through those four tests in the order an appraiser applies them: age from construction, identity from marks, condition from the surface and value from comparable sales. Antiqly makes a photo identification app that is free to download on iPhone and free on Android with no sign-up; the guide itself is a review of the published references linked in the text, no object was examined or tested for it, and it quotes no prices. Where a subject needs more depth it links to our detailed guides.

    What makes an antique valuable?

    An antique is valuable when age, condition, maker, provenance and demand all point the same way, and demand decides the price. The word itself has a threshold: heading 9706 of the United States Harmonized Tariff Schedule covers antiques of an age exceeding 100 years, and the customary definition summarised by Wikipedia adds that the item should be at least 100 years old and in original condition, while vintage and collectible are used to describe items that are old, but do not meet the 100-year criterion. Our guide to antique vs vintage vs retro gives the year cutoffs for 2026. Age only opens the door: a common household object from the 1820s can be worth less than a signed designer piece from the 1960s, because buyers pay for what they want, not for years.

    Factor What to check Where it is documented
    Age Construction, materials and wear that agree with the claimed period; more than 100 years for the word antique Harmonized Tariff Schedule heading 9706; Wikipedia
    Condition and originality Original surface, original parts and hardware, extent of restoration IRS Publication 561
    Maker and marks Signatures, hallmarks and labels read against dated references Hallmarking Act 1973, Schedule 2
    Provenance How long the object has been in the family, receipts, photographs, labels Smithsonian American Art Museum research guide
    Demand Recent sales of closely comparable pieces, not asking prices IRS Publication 561

    Condition and originality carry the most weight within a category. The Internal Revenue Service’s Publication 561, written for valuing donated property but a plain statement of appraisal practice, says that the physical condition and extent of restoration are both relevant in determining the valuation of art and antiques, and gives the example of an antique in damaged condition lacking the original brasses, which may be worth much less than a similar piece in excellent condition. The same publication ties value to the market: the sales prices of properties similar to the donated property are often important in determining the FMV, and sentimental personal value has no effect on FMV. Provenance supports both: the Smithsonian American Art Museum’s research guide starts with how long the work has belonged to you or your family and tells you to check family records and interview relatives who might know something about the artwork, advice that applies just as well to a chest or a tea service. Our guide to five quick signs an antique is worth money applies these factors at home, and identifying real and valuable antiques explains the types of value and how to find an appraiser.

    How to date antique furniture by its construction

    Construction dates furniture because saws, nails and screws changed in documented steps, and each clue sets an earliest possible date for the joint it sits in rather than an exact year. Start underneath and behind: the underside of a top, the backboards and the inside of a drawer keep the tool marks that the polished front lost long ago.

    Saw marks come first. Before the circular saw, the history of that tool records, logs were sawn by hand using a pit saw or using powered saws in a sawmill using an up-and-down saw with a reciprocating motion, which leaves straight, roughly parallel marks; circular saws were invented in the late 18th century and were in common use in sawmills in the United States by the middle of the 19th century, so curved arcs on a secondary surface argue against a date much before 1850 for that board. Nails follow the same logic. The history of the nail is divided roughly into three periods: hand-wrought (forged) nail (pre-history until 19th century), cut nail (roughly 1800 to 1914) and wire nail (roughly 1860 to the present); in the United States in 1886, 10 percent of the nails made were of the soft steel wire variety, in 1892 more steel-wire nails were produced than cut nails, and in 1913 wire nails were 90 percent of all nails produced, so a piece full of round wire nails most likely dates from the 1880s or later. Screws are the most misread clue. The history of the screw notes that the metal screw did not become a common fastener until machine tools for mass production developed toward the end of the 18th century; early wood screws were made by hand and can be spotted by the irregular spacing and shape of the threads, as well as file marks remaining on the head of the screw, and many of these screws had a blunt end, completely lacking the sharp tapered point on nearly all modern wood screws.

    Clue What you see What it indicates
    Straight, parallel saw marks Even lines across a secondary surface Pit saw or reciprocating mill saw; consistent with work from before circular saws became common in the mid-19th century
    Curved saw marks Arcs across the board Circular saw; in common use in United States sawmills by the middle of the 19th century
    Hand-wrought nails Irregular hammered head and shank; no two alike Forged nails, the norm until the 19th century; still made today for repairs and reproductions
    Cut nails Roughly rectangular cross section, hence the name square nails Roughly 1800 to 1914
    Wire nails Round shank, uniform machine-made head Roughly 1860 onward; more than half of United States output by 1892
    Hand-made screws Irregular thread spacing, file marks on the head, often a blunt end Made before screws became a common machine-made fastener at the end of the 18th century, and in hand-finished work after it

    Every one of these clues can be replaced or faked, so read them together and against the wood and the wear. Our guide to dating furniture by its hardware gives the detailed nail, screw and hinge chronology, the 1800s dresser guide compares dovetailed with nailed drawers, detecting reproductions shows how new wood differs from a century-old surface, and the furniture periods chart puts the styles in order. Hardware dates the joint, not necessarily the piece: screws, hinges and pulls are replaced routinely, and a marriage of parts from different dates is itself useful information about what you are looking at.

    How to read marks on silver, gold and jewelry

    Two hands holding an old tarnished silver spoon and a small magnifying glass at a wooden table
    Marks sit on the back of handles, bases and rims; read them with a magnifier and then check that the object agrees with what they claim.

    A hallmark tells you the fineness of the metal and, on British pieces, where it was tested, but it never proves on its own that the object is old or that the stone in it is genuine. Schedule 2 of the United Kingdom’s Hallmarking Act 1973 lists the statutory standard marks: the figures 925 for sterling silver and 750 for 18-carat gold, alongside 800, 958 and 999 for silver and 375, 585, 916, 990 and 999 for gold. The optional pictorial mark for 925 silver is a lion passant, treated as a lion rampant when the article is struck by the Edinburgh Assay Office, and the assay office marks are a leopard’s head for London, a castle for Edinburgh, an anchor for Birmingham and a rose for Sheffield. The figures are parts per thousand of pure metal, so 925 means 92.5 percent silver and 750 means 75 percent gold.

    Scope matters: these are the British statutory marks, and other countries mark differently, as our guides to silver purity marks around the world, American silver hallmarks and what 10K, 14K and 18K mean explain; the British silver hallmarks chart decodes date letters and makers’ marks. Marks are the most copied feature of any antique, so treat them as a research lead and check that the object agrees with them: how to spot fake silver hallmarks lists the red flags, and our marks and signatures guide shows where to look on furniture, ceramics and glass. Stones are a separate question from settings. Publication 561 states that gems and jewelry are of such a specialized nature that it is almost always necessary to get an appraisal by a specialized jewelry appraiser, whose report should describe the stone’s coloring, weight, cut, brilliance, and flaws; a hallmark on the mount says nothing about the stone it holds.

    Why original condition matters more than a clean surface

    An untouched original surface is worth keeping because conservators, appraisers and buyers all treat it as part of the object’s value. The Canadian Conservation Institute’s note on the care of furniture finishes states that original furniture finishes have historical, aesthetic and financial value and, as such, should be maintained, and that before cleaning a coated wooden surface it is necessary to determine what type of coating it is, whether or not it is stable, if it has been modified or refinished and what the effect of the cleaning technique will be. For a finish in good condition it adds that effective cleaning can often be as simple as damp dusting followed by buffing, complemented with careful, infrequent waxing. Stripping, sanding and repolishing remove exactly the evidence of age described above, and the IRS example of the missing original brasses shows how replaced parts read to an appraiser. The same caution applies to metal: dips and home chemistry can strip plating and patina, as our review of baking soda and foil silver cleaning explains, and our guide to restoring versus preserving furniture sets out when a professional repair is justified.

    Common mistakes when identifying antiques

    The most common mistake is treating one clue as proof, whether that clue is age, a mark or an asking price. Age is not value: Publication 561’s own example is a rare book that is a third edition and is in poor condition because of a missing back cover, for which a sale of a first edition in good condition is not a useful comparable, because the books are not at all similar because of the different editions and their physical condition. A convincing surface is not age either: Wikipedia notes that antiquing also means the craft of making an object appear antique through distressing or using antique-looking paint applications, and that individuals get confused between these handmade distressed vintage or modern items and true antiques. Look for wear where hands and floors actually touched the piece, for machine uniformity where hand work is claimed, and for modern hardware sitting in old holes; the 10 most commonly faked antiques covers the categories where this matters most.

    Prices need the same scepticism. The IRS cautions that catalogs, dealers’ price lists and hobby periodicals are not always reliable indicators of FMV and should be supported by other evidence, that a dealer may sell an item for much less than is shown on a price list, and that the price an item sold for in an auction may have been the result of a rigged sale. Use completed and sold results for closely similar pieces, as how to look up antique values like a professional appraiser shows, and give a sale more weight the closer it is to your piece in similarity, condition and date.

    Where photo identification apps fit

    A photo identification app is a quick way to put a name, a period and a search term on an object, and its result is a lead to verify against dated references and sold prices, not an appraisal. Antiqly is our own app, so read this section as the publisher’s view: it is free to download on iPhone and Android with no sign-up, and this article reports no test of it or of any other tool. Whatever you use, the photographs decide the result: shoot in daylight from several angles, add close-ups of marks, joints and damage, include an object of known size for scale, and photograph the underside and back as well as the front. Then confirm the suggestion the way the sections above describe. Our guide to AI antique appraisal accuracy and limits sets out what image recognition can and cannot do.

    How to store and protect antiques

    Light, damp and careless handling do more harm to antiques than age does, and all three can be controlled at home. The Canadian Conservation Institute’s basic requirements of preventive conservation warn that both direct sunlight and powerful electric light can destroy, in months, the colours that may have lasted a century or more, and that damp is a rapid and aggressive agent of deterioration that places objects at risk from hazards such as mould, corrosion and irreparable deformation, often within hours or days. Keep textiles, painted and polished surfaces out of direct sun, keep furniture away from radiators, damp walls and basements, lift a piece by its frame rather than by arms or handles, and photograph and record every object so that its condition and history are documented before anything changes.

    When to pay for a professional appraisal

    Pay for a written appraisal when money, insurance or the law depends on the figure, and use free research for everything else. In the United States a charitable deduction of more than $5,000 for art and collectibles must be supported by a qualified appraisal, gems and jewelry almost always need a specialized jewelry appraiser, and no part of the fee arrangement for a qualified appraisal can be based on a percentage of the appraised value of the property, so expect a flat or hourly fee. Insurance, estate division and the sale of a piece you believe is significant call for the same standard. Our guide to identifying real and valuable antiques names the appraiser societies whose directories to use and explains the difference between auction, insurance and fair market value, and how to appraise estate sale items covers quick decisions in the field.

    Quick reference: antique identification checklist

    • Count the years: more than 100 makes it an antique; anything younger is vintage or collectible.
    • Turn it over: saw marks, nails, screws and secondary wood set the earliest date for each joint.
    • Read the marks against a dated reference, then check that the object agrees with them.
    • Grade the condition: original surface, original parts, extent of restoration.
    • Gather provenance: family history, receipts, photographs and labels.
    • Compare with sold prices of closely similar pieces, not with asking prices.
    • Limit cleaning to damp dusting until you know what the finish is.
    • Pay for a written appraisal when insurance, tax or a major sale depends on it.

    Frequently asked questions

    Does an antique have to be 100 years old to be valuable?

    No. The 100-year threshold defines the word antique in customs law and trade usage; value comes from condition, maker, provenance and the prices closely comparable pieces have recently fetched, so a younger vintage piece can be worth more than a common antique.

    Can I identify a valuable antique from a photograph?

    A photograph can identify the type, period and likely maker well enough to start research, but not the weight, marks, construction and condition that decide value. Use the image result as a search term, then examine the object and check sold prices.

    Should I clean an antique before selling it?

    Only dust it. An original surface has financial value to buyers, and stripping, polishing or chemical dips remove it along with the evidence of age; if a piece needs more than damp dusting, ask a conservator first.

  • Identifying Real and Valuable Antiques

    Identifying Real and Valuable Antiques

    An antique is more than 100 years old; confirm it by checking construction, wear and marks against dated references, and price it from comparable sales.

    This guide, published by Antique Identifier – Antiqly, works through the four questions behind that answer: what counts as an antique, how to tell a period piece from a reproduction, what actually drives value, and how to get a valuation or sell without losing money to fees. Antiqly makes a photo identification app that is free to download with no sign-up; the guide itself is a review of published references, not an appraisal of any individual piece, and where a subject needs more depth it links to our detailed guides.

    What counts as an antique?

    An object counts as an antique when it is more than 100 years old, a threshold that comes from customs law and that the trade follows. Heading 9706 of the United States Harmonized Tariff Schedule covers antiques of an age exceeding 100 years, and the customary definition summarised by Wikipedia adds that the piece should be at least 100 years old and in original condition. Items that are old but do not meet the 100-year criterion are described as vintage or collectible rather than antique; our guide to antique vs vintage vs retro sets out the year cutoffs for 2026.

    Age alone is not the whole test. A heavily rebuilt piece, or one whose surface has been artificially aged, is not what a buyer means by antique. The same reference notes that antiquing also means the craft of making an object appear antique through distressing or using antique-looking paint applications, and that individuals often get confused between these distressed pieces and true antiques. A reproduction can itself be fifty years old and still not be an antique of the period it imitates.

    How to tell if an antique is real

    Two hands pulling out a wooden drawer to inspect its corner joint and the pale unfinished wood inside
    A drawer corner shows the joinery, the secondary wood and the wear together; compare them with what the claimed date predicts.

    You tell a real antique from a reproduction by checking whether its materials, construction and wear agree with the period it is supposed to come from, and by treating any single clue as a lead rather than as proof. Start with the parts nobody was meant to see: the underside of a table, the back of a chest, the inside of a drawer, the foot of a vase, the reverse of a painting. Old work usually shows hand tool marks, unfinished secondary wood, oxidation and dust in the joints, and repairs made with the materials of their own time. On furniture the nails, screws and hinges are datable, and our guide to dating furniture by its hardware explains what each generation of fastener looks like.

    Wear should be uneven and logical, concentrated where hands, feet and floors met the object, while an even, all-over distressing points to deliberate aging. Maker’s marks, hallmarks and signatures are useful, but they are the most copied feature of all, so read the mark together with the object: our antique marks and signatures guide shows how to look a mark up, and sterling silver vs silver plate shows how a metal test backs up a stamp. Material tests follow the same rule: a magnet, a loupe or an ultraviolet lamp can rule a piece out, but none of them can on its own rule it in.

    Finally, ask where the object has been. The Smithsonian American Art Museum’s research guide begins with how long the work has belonged to you or your family and advises you to check family records and interview relatives who might know something about it; the same provenance questions apply to furniture, silver and ceramics, and a receipt, an old photograph or an auction label can settle what the object itself cannot. For the categories most often copied, see the 10 most commonly faked antiques.

    What makes an antique valuable

    An antique is worth what comparable pieces have actually fetched at recent sales, adjusted for its condition, rarity, provenance and the current demand for that kind of object. The reference point is fair market value, which the Internal Revenue Service defines in Publication 561 as the price that would be agreed on between a willing buyer and a willing seller, with neither being required to act, and both having reasonable knowledge of the relevant facts; the same publication notes that the sales prices of properties similar to the one being valued are often important in determining it. That is why asking prices in shops and online listings are weak evidence: they show what a seller hopes for, not what a buyer paid.

    The Smithsonian’s appraisals page puts the same point plainly: antiques, artworks and other collectible items have such an individual nature that fixed values are difficult to establish, and prices asked and amounts offered are determined by the personal interests of both seller and purchaser and by trends in the market. Within a category, condition and originality carry the most weight, then rarity, but rarity only pays when collectors want the object; our guide to telling whether an antique is worth money works through the five signs you can check at home, and how to look up antique values like an appraiser shows where to find sold results.

    Value also has several meanings. An insurance appraisal states replacement cost, an auction estimate anticipates a hammer price, and fair market value is what a willing buyer would actually pay. The IRS illustrates the gap with an insured piece of jewelry: the insurance figure does not reflect what a willing buyer and willing seller would pay for the jewelry on the date of the contribution to charity, it reflects only the replacement cost of the jewelry when you obtained the appraisal. The same publication adds that a cost or selling price may have less weight if the property was not bought or sold at a time that is reasonably close to the valuation date. When you compare your piece with a published number, check which kind of value it was and when it was given.

    How to get antiques valued without overpaying

    Match the valuation to your purpose: a written appraisal by an accredited appraiser is what insurance, tax and estate work require, an auction-house estimate tells you what a sale might bring if you are thinking of consigning, and a photo identification app is a starting point for research rather than either. The Smithsonian Institution does not, as a matter of policy, offer monetary evaluations, and its appraisals page points the public instead to three professional bodies, each of which publishes a directory of its member appraisers: the American Society of Appraisers, the International Society of Appraisers and the Appraisers Association of America. For help identifying rather than pricing an object, the same page suggests university or area libraries and state and local historical societies or museums.

    Two rules from the IRS guidance on qualified appraisals are worth applying to any paid valuation. First, no part of the fee arrangement for a qualified appraisal can be based on a percentage of the appraised value of the property, so expect a flat or hourly fee. Second, the appraiser must be independent of the object’s history: the publication excludes the owner, the recipient and any party to the transaction in which the owner acquired the piece, and gives the example that if the donor acquired a painting from an art dealer, neither the dealer nor persons employed by the dealer can be qualified appraisers for that painting. The same independence logic argues against asking a prospective buyer to tell you what your piece is worth. Online services range from free photo tools to paid written opinions; our comparison of online antique appraisal sites and our review of free vs paid identification apps set out what each actually delivers. Whatever route you choose, a photograph-based estimate, including one from our own app, is a first suggestion to check against sold results, not an appraisal.

    How to sell antiques the smart way

    Sell an antique where its buyers already look, and compare what you will actually keep after fees rather than the headline price. The main routes are a specialist auction, a dealer and an online marketplace, and each trades money for speed and effort differently. At auction the seller pays a commission calculated on the hammer price; Skinner’s consignment guide explains that this seller’s fee can differ seller to seller and that other seller’s fees might include nominal charges for photography, insurance, transportation or special services. The buyer’s premium is a separate charge paid by the buyer, so the figure you hear in the saleroom is the gross hammer price, not the sum that reaches you; ask for the commission and every extra charge in writing before you consign, and work out your net from the low estimate rather than the high one.

    A dealer pays at once but at a wholesale price, because the dealer must resell at a profit, so this route suits pieces you want gone quickly or that are too ordinary to justify auction charges. An online marketplace lets you set the price and reach the widest audience, but you carry the listing fees, shipping, returns and the risk of pricing wrong. Before you list, search completed and sold results for the same maker, pattern or model rather than current listings, and photograph the marks, the damage and the underside so buyers can verify what you say. Our ranking of where to sell antique silver applies this net-proceeds comparison to one category in detail. Never sell before you know what the piece is: a correct identification changes which buyers you approach and what a sensible reserve looks like.

    A five-minute check before you buy or sell

    Run the same short sequence every time, because it keeps the questions in the right order. First count the years: more than a century makes it an antique, anything younger is at most vintage, and a period style is not a period date. Second, turn the piece over and look for the construction, materials and wear that the claimed date predicts, and treat marks and signatures as leads to verify rather than as proof. Third, gather provenance, which means asking the family, keeping receipts and labels and noting where the object has lived. Fourth, find what comparable pieces recently fetched at auction or in completed online sales, and note which kind of value each figure represents. Fifth, before you pay for an appraisal or consign to a sale, get the fee structure in writing and check that the appraiser has no stake in buying the piece. None of these steps needs special equipment, and together they catch most of the mistakes that turn a hopeful attic find into a disappointing sale.

    Frequently asked questions

    How do you know if something is an antique or just old?

    Count the years first: more than 100 makes it an antique by the customs definition used in the United States, and anything younger is vintage or collectible. Then check that the construction, materials and wear match the claimed date, because age can be imitated by distressing and a reproduction can be decades old itself.

    Does a maker’s mark show that an antique is real?

    Not on its own. A mark is the easiest feature to copy, so it is a lead to research rather than a conclusion. Confirm that the mark’s documented dates fit the object’s construction and materials, and that the wear looks lived-in rather than applied, before you rely on it.

    What is the difference between auction value and insurance value?

    Auction value is an estimate of what a piece would bring in a sale, while insurance or replacement value is the cost of replacing the piece at retail today, so the two figures are usually different. The IRS example in Publication 561 is an insured piece of jewelry whose insurance figure reflects only the replacement cost when the appraisal was obtained, not what a willing buyer would pay. Ask which figure you are being given before you compare it with a sale result.

Download Antique Identifier App
Scan to Download
Identify antiques instantly with AI
★★★★★ FREE
🔍 IDENTIFY NOW 🔍 IDENTIFY NOW